Well, it's Friday — the end of a very long week and close to the end of my summer/fall craft show season. Tonight kicks off the DIY Street Fair in Ferndale. I'll be in booth #102 and the show runs through Sunday. Come hear some music, have a beer and look at some art. Sounds fun, huh?! And then… Monday morning the boy and I run off to the Upper Peninsula for two weeks of unplanned, unchartered, dreamy northern exploring. That's right, we'll be gone for two whole weeks. I had thought that I would have a slew of posts scheduled to run in my absence because there has been a lot going on around here lately that I still need to tell you about. But really, the last two months have been such a whirlwind of activity that there just hasn't been time. And so, I leave you with peace and quiet on this space until the first week of October. I still have lots to share with you — some new designs in the works (a little sneak peek above from a project in the works), recent finds, yummy recipes and more — and I'll be gathering more from the northern climes (I've never been!). In the meantime, enjoy these crisp fall days and I'll see you soon!
Friday, September 17, 2010
Last show, then… vacation!
Well, it's Friday — the end of a very long week and close to the end of my summer/fall craft show season. Tonight kicks off the DIY Street Fair in Ferndale. I'll be in booth #102 and the show runs through Sunday. Come hear some music, have a beer and look at some art. Sounds fun, huh?! And then… Monday morning the boy and I run off to the Upper Peninsula for two weeks of unplanned, unchartered, dreamy northern exploring. That's right, we'll be gone for two whole weeks. I had thought that I would have a slew of posts scheduled to run in my absence because there has been a lot going on around here lately that I still need to tell you about. But really, the last two months have been such a whirlwind of activity that there just hasn't been time. And so, I leave you with peace and quiet on this space until the first week of October. I still have lots to share with you — some new designs in the works (a little sneak peek above from a project in the works), recent finds, yummy recipes and more — and I'll be gathering more from the northern climes (I've never been!). In the meantime, enjoy these crisp fall days and I'll see you soon!
Wednesday, September 15, 2010
Necklace love: Muggy Tuesday
Tuesday, September 14, 2010
Renegade Chicago Craft Fair
Friday, September 10, 2010
Do it yourself, gosh darn it!
Thursday, September 09, 2010
Cuban-Style Pork worthy of the clipping service
Wednesday, September 08, 2010
The Sketchbook Project 2011
I had one selected at random and am really excited because it wasn't even on the list: A record year for rainfall. Yay! It's due back in January, so I better get drawing… but the project is open to anyone, so go check it out and get your sketchbook!
Thursday, September 02, 2010
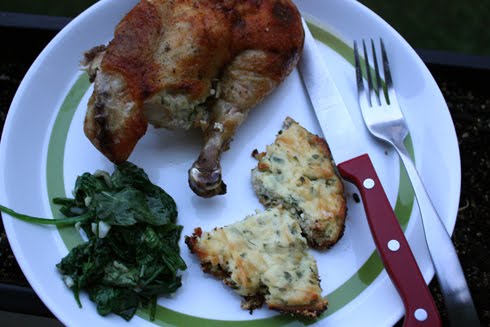
Roasted Chicken with Ricotta & Herb Filling
This recipe is one of my all-time go-to roast chicken recipes. You may not be able to tell in the dark, blueish photo above, but with this recipe you get a beautifully browned, moist chicken every time with a tasty, cheesy ricotta and herb filling that lands somewhere between a soufflé and a popover. The chicken is spatchcocked -- butterflied and spread flat, easier than it may sound -- which ensures even cooking throughout the bird. The filling is so tasty on its own though, that you could easily skip that, roast your chicken in your usual way and just cook the filling on its own. This recipe makes extra filling anyway to be cooked separately. Be sure to use a high-quality ricotta as it provides the main flavor. Roasted Chicken with Ricotta and Herb Filling
Adapted from Gourmet, July 2007
2 garlic cloves, minced
1 1/2 Tb extra-virgin olive oil
2 cups whole-milk ricotta (preferably fresh; 2 pounds)
1 large eggs, lightly beaten
1/2 cup grated Parmigiano-Reggiano
2 Tb chopped fresh oregano
2 Tb chopped fresh flat-leaf parsley
Chicken
1 whole chickens (about 3 1/2 pounds)
1 Tb extra-virgin olive oil
Preheat oven to 400°F with racks in middle and lower third. Oil a large shallow roasting pan.
Filling:
Heat oil in a small heavy skillet over medium-low heat. Add garlic and cook, stirring occasionally, until just golden, about 2 to 3 minutes. Transfer to a bowl and stir in ricotta, eggs, parmesan, herbs, 1/4 teaspoon salt, and 1/8 teaspoon pepper.
Chicken:
Remove backbone from chicken with kitchen shears by cutting down either side of the bone as close as possible and then removing. Pat chickens dry inside and out, then spread flat, skin sides up. Cut a 1/2-inch slit on each side of chicken in the triangle of skin between the thigh and breast near the drumstick, then tuck the knob of each drumstick through slit. (Here is a more detailed photo how-to for spatchcocking from the San Francisco Chronicle.)
Sprinkle chicken with 1/2 teaspoon salt and 1/2 teaspoon pepper and spread flat, skin side up, in prepared pan. Gently slide your finger between skin and flesh of breast and legs to loosen skin being careful not to tear skin. Using a small spoon, slide 2/3 cup ricotta mixture under skin, using a finger on outside of skin to spread filling over meat of breast, thighs, and drumsticks. Tuck wing tips under. Brush skin all over with 1 tablespoon oil (1 tablespoon) and season with 1/2 teaspoon salt and 1/4 teaspoon pepper.
Spoon remaining filling into an oiled 1-quart shallow baking dish (approximately 10 x 7 inches).
Bake chicken in middle of oven 30 minutes, then put dish of stuffing in oven on lower rack. Continue baking until chicken is just cooked through and an instant-read thermometer inserted into thickest part of a thigh (through stuffing; do not touch bone) registers 170°F and until gratin is puffed and golden, about 30 minutes more. Let chicken rest 10 minutes, then cut into quarters. Serve with baked filling.

Wednesday, September 01, 2010
Just 10 more days until Renegade Craft Fair
That's right! Just ten more days until Chicago's Renegade Craft Fair. Saturday, September 11 and Sunday, September 12 from 11 a.m. to 7 p.m in Wicker Park. Over 300 vendors (wow!) I'll be there selling my wares — and sharing a booth with Michelle of Elevated Press. In the meantime, I'm busy printing and prepping, with not as much time for the kitchen as I would like. But the craft shows are so worth it because I get to meet some of you in person and see your smiling faces. So please do come on by and say hello! Monday, August 30, 2010
Calling all foodies in NY: Ticket giveaway!
Hi all! I wrote a little about the North Fork Foodie Tour a few weeks back while I was designing the poster for it. Now I'm back with a few tickets to give away. The tour takes place on Sunday, September 12 on the beautiful North Fork of Long Island, NY — the perfect excuse for a weekend getaway! Fall is the best of the best seasons on the North Fork and you'll get to visit amazing artisan food producers and farmers throughout the area. All you need to do to win a pair or two of tickets is visit Sloe Gin Fizz, my Etsy shop, and leave a comment below letting me know what your favorite item is. Please include your email address in the comment so I can let you know if you've won. That's it. It's that easy and then you could be drinking wine, slurping oysters, sampling goat cheese, all while touring the lovely North Fork on a beautiful fall day! I have two pairs of tickets to give away and since this is only available to those who can get themselves to the North Fork, I will choose one comment at random as the winner. I will offer that winner the option of all four tickets and if they only want two, I will move on to winner number two. You must enter by Sunday, September 5 at 12noon. I'll announce the winner on Monday, September 6. Spread the word to anyone you think might be able to make it to the area for the tour! Thanks so much for playing along! Here's a glimpse of the North Fork to get you in the mood…Friday, August 27, 2010
A flower for Friday
A flower for you late on this Friday afternoon… have a wonderful weekend! Maybe I'll see you at the People's Arts Festival in Detroit? If not… let's chat Monday.Thursday, August 26, 2010
Drawing a dream car
Wednesday, August 25, 2010
4th Annual People's Arts Festival
Tuesday, August 24, 2010
The Flexitarian Table: Shrimp with Harissa
SHRIMP
1/2 tsp ground fennel, preferably toasted and freshly ground
1/2 tsp ground caraway, preferably toasted and freshly ground
1/2 tsp cayenne pepper, or to taste
1 tsp sea or kosher salt
5 Tb olive oil
1/4 cup fresh lemon juice
2 large garlic cloves
1 pound large shrimp, peeled and deveined
In a medium bowl, stir together cumin, fennel, caraway, cayenne and salt. Whisk in olive oil, lemon juice and garlic. Toss shrimp in mixture and marinate 10 to 15 minutes. Do not marinade for longer as the acid of the lemon will start to cook the shrimp and make it tough.
Preheat broiler or grill.
Thread shrimp onto skewers (if using bamboo skewers, be sure to soak in water for at least 30 minutes before using). Cook under broiler or grill until cooked through, turning once, about 3 minutes per side.
ZUCCHINI
1-2 small zucchini, sliced lengthwise, 1/2-inch thick
Sea or kosher salt
1/4 cup olive oil
2 garlic cloves, thinly sliced
Pinch of red pepper flakes
1 Tb coarsely chopped fresh mint
1 tsp red wine vinegar
Freshly ground black pepper
Sprinkle zucchini slices all over with salt. Lay flat on kitchen or paper towel to drain for 30 minutes.
Meanwhile, in a small saucepan, combine oil, garlic and red pepper flakes. Bring just to a simmer and cook gently for 5 to 7 minutes, until garlic is golden. Add mint and remove from heat.
Light a grill or preheat broiler.
Brush off all the salt and pat zucchini dry. Lightly brush tops with mint oil. Place oiled side down on grill or broiler pan and cook, turning once, until softened and nicely browned, 4 to 5 minutes per side. (I put the zucchini under the broiler a couple of minutes before adding shrimp so all would finish at once.)
Transfer zucchini to platter and drizzle with 1-2 Tb of remaining mint oil and the vinegar and season with salt and pepper.
Thursday, August 19, 2010
Oasis in the city: County Farm Park
Most of these are from the Project Grow community garden plots located there, but the park has so much more to explore. I didn't even get a chance to walk through the perennial gardens or into the Briton Woods nature trails… I can't wait to go back!Wednesday, August 18, 2010
Yes, that's right: MORE fried chicken
I do love my fried chicken. Can't you tell? I am posting yet another recipe for it — this one is an easy, weeknight oven-baked variety from Paula Deen, as opposed to the super-deluxe Chesapeake Fried Chicken I wrote about recently from my pal John. It's super crispy from panko bread crumbs, and has some hidden mustardy goodness to keep it moist and flavorful. I'm sorry to say that all you get is this one lousy photo. I was going to come back and take a couple more photos once I sliced it open, but I made the mistake of having a bite first and completely forgot and chowed down on it in a flash. You would have done the same — I know you would. Mustard & Panko Oven-Fried Chicken
Adapted from Paula Deen
Serves 2.
1 cup Panko bread crumbs
1/2 cup grated Parmesan cheese
2 tablespoons olive oil, divided
1 tablespoons freshly minced thyme leaves
Salt and pepper
2 Tb Dijon mustard
1 Tb water
2 boneless skinless chicken breasts, pounded to 1/4 -inch thickness
Preheat oven to 400ºF. Line a baking sheet with foil and place a cooling rack in the pan. Brush the rack with oil.
In a shallow dish, combine Panko, cheese, 1 tablespoon olive oil, thyme, salt and pepper, to taste. In a separate shallow dish, combine mustard, water, salt and pepper, to taste, and remaining olive oil.
Dip each chicken breast in mustard mixture to coat and then dredge each in bread crumb mixture, patting the crumbs into place if necessary. Place on prepared rack in pan. Bake for 25 to 30 minutes, or until chicken is golden brown.
Tuesday, August 17, 2010
Come be social & crafty at the Blue House

What are you doing with your bad self tomorrow evening? I know what I'll be doing to stay out of trouble: I'll be curled up in a comfy chair over at the Blue House gettin' my craft on. If you're in the Ann Arbor area, how about stopping by for a little crafty socializing? We're having a casual drop-in "MakersMEET," so pull up a chair with that project you've been working on, come start a new one you've been meaning to get to, or just come and chat and chill. Feel free to bring some wine, beer, snacks, what have you... or nothing at all but your sweet self. Now I just need to decide whether to bring the little sewing project (top photo) I started at the June MakersMEET and haven't touched since -- or my latest knitting project (bottom photo). Hope to see you there! Monday, August 16, 2010
Gram's Fruit Cake
My mom has been making this cake for as long as I can remember‚ especially in summer. When I copied down the recipe, it was for "Gram's Fruit Cake." I don't know who's gram it's from, but I'm sure she's been making the rounds because this is such an easy and versatile cake. It's one of those desserts you can so easily throw together for last minute company or running out the door to a picnic or potluck. You almost certainly have the ingredients in your pantry as long as you can scrounge up one paltry piece of fruit. The original called for one McIntosh apple, but you can substitute just about any fruit you'd like: peaches, pears, blueberries, strawberries, etc. That's the beauty of it — that, and it tastes great! This weekend I made it with my all-time favorite fruit combination: peaches and blueberries. 
1 cup flour
1 cup sugar
2 tsp baking powder
1 egg
1/2 cup milk
2 Tb butter, melted
1 McIntosh apple or equivalent other fruits (use as much as you'd like)
cinnamon
1 tsp sugar
Preheat oven to 400ºF.
Grease an 8x8-inch baking pan.
Sift together flour, sugar and baking powder.
Beat together egg and milk and add to dry ingredients.
Pour into prepared pan.
Cut fruit and place on top of batter. Sprinkle with cinnamon and about 1 tsp sugar.
Bake 25-30 minutes until toothpick inserted in center comes out clean.
As you can see, I get all crazy about placing the fruit — kind of like meticulously filling in every single holes on a waffle with syrup. This is completely unnecessary as the cake bakes up around and over the fruit, so you won't see the pattern. But I still find it very satisfying. Do as you will…Friday, August 13, 2010
Guest post: Aida's Ham and Cheese Cake

I contacted Diane and she graciously offered to share with me — and you — this recipe that has long been a favorite in her family. Voilá! The result is that today I present you with this blog's first ever guest post and recipe. Welcome, Diane!Aida, my mother — the greatest cook — is always looking for new recipes and when we were still living in Paris, France, she discovered this salty cake in a magazine. When we tried it… what a success! It was a hit in our family and has been ever since! That makes 20 years and still counting! So when Nicole tasted it, she got hooked and here’s for you one of the favorite recipes of my family.
Makes 1 loaf.
3 eggs
1 3/4 cup flour
1/2 tsp salt
1/4 tsp pepper
1 cup diced ham
1 1/2 cups sharp cheddar cheese, shredded
3/4 cup olives, sliced
1 Tb herbes de provence (or a mix of dried oregano, rosemary, sage, basil & thyme)
1/4 cup olive oil
1 1/8 tsp active dry yeast
1/3 cup of milk
butter for the pan
Preheat oven to 350ºF.
Butter a standard loaf pan.
Blanch the olives for a few seconds so they are less salty. (Note from Nicole: Place them in a strainer that you can submerge in boiling water for a minute or two and then lift out. Run under cold water for a few minutes and then drain well.) Dry them well with paper towel.
Sift together the flour, salt and pepper into a mixing bowl.
Lightly whisk eggs in a separate bowl, then add the yeast and milk combination and olive oil.
Slowly add the wet ingredients to the dry and stir until just combined. Fold in the ham, cheese, olives and herbs.
Pour batter into prepared pan — it should be no more than ¾ full. Bake until cake is just firm to the touch and a toothpick inserted into the center of the cake comes out clean, 35 to 40 minutes. Let cool 5 minutes on a rack, then turn out onto rack and allow to cool completely.
You can always add some sun to your cake with sundried tomatoes, or toasted pine nuts, or apricot and hazelnuts. As long as you have good ham, good cheese, good olives, that’s a good start and then you can improvise!
Bon Appétit! ;)
I did a little more digging online to figure out the origins of "salt cakes" and found a recent article in the New York Times (it appeared just days after the salt cake crossed my lips!) that describes cake salés, or savory quick breads that in France you often find at informal family gatherings, but rarely in restaurants or markets. The article even talks about a New York chef whose French mother saves cake salé recipes clipped from women's magazines for him. Hurray for French magazines!
Thanks so much to Diane and Aida for sharing this little slice of France.
Enjoy and have a wonderful weekend!
Thursday, August 12, 2010
Local love: Courtney Fischer Jewelry
This summer has been all about taking part in local craft shows — which means, of course, lots of shopping at local craft shows! I'd had my eye on this delicate leaf necklace from Courtney Fischer Jewelry since early July. And, to my delight, the boy picked it up for me for my birthday. Aw shucks. So sweet. And that's just what I'd say about Courtney, too: aw shucks, so sweet! The girl's a doll and her jewelry is gorgeous, affordable and local — coming to you from Royal Oak. You can see more jewelry treats in her Etsy shop, Cefische.Wednesday, August 11, 2010
Quick, easy — pico de gallo
Tomato season is finally here which means plenty of fixin's for the beak of the rooster! Huh? What? Pico de gallo, of course! Fresh, hand-cut salsa — the perfect treat, with some nice fresh tortilla chips, at the end of a long, steamy day. Pico de Gallo
Makes about 2 1/2 cups.
1/2 medium white onion, finely chopped
4-6 ripe tomatoes, finely chopped
1 or 2 jalapeño or serrano peppers, finely chopped
½ cup fresh cilantro, chopped
1-2 tablespoon lime juice
Salt to taste
Combine all the ingredients in a nonreactive bowl and chill for about an hour or so.