 Through a random internet search last night, I stumbled onto the SELMA cafe here on the Westside of Ann Arbor. Hosted by Lisa Gottlieb and Jeff McCabe in their home, it is a once-a-week Friday breakfast from 6:30 to 10:00AM — open to the public. They have guest chefs each week who prepare local foods. Today was Scott MacInnis preparing omelets to order featuring Michigan Mushrooms, hoop-house greens, house-cured meats and local cheese. As I walked up the driveway to the side entrance of their house, I admired the tidy collection of chickens and neat-as-a-pin garden plots. Once inside, I was warmly greeted by Lisa who offered up some masking tape for a name tag and sat me in the kitchen with a U of M law student and her boyfriend visiting from Boston, and Archie — a character active on the local food scene who was seemingly known by everyone in the room. I really wanted to take a picture of the meal, but was embarrassed with my new companions at the table. Shoulda, coulda, woulda. The conversation was lively and the food was divine. Volunteers help out in the kitchen and do the serving. The room was alive with chatter and animated discussions. There was plenty of Roos Roast coffee to go along with the meal and some mighty tasty whole grain bread. I may just become a regular!
Friday, April 17, 2009
Open house breakfast
Through a random internet search last night, I stumbled onto the SELMA cafe here on the Westside of Ann Arbor. Hosted by Lisa Gottlieb and Jeff McCabe in their home, it is a once-a-week Friday breakfast from 6:30 to 10:00AM — open to the public. They have guest chefs each week who prepare local foods. Today was Scott MacInnis preparing omelets to order featuring Michigan Mushrooms, hoop-house greens, house-cured meats and local cheese. As I walked up the driveway to the side entrance of their house, I admired the tidy collection of chickens and neat-as-a-pin garden plots. Once inside, I was warmly greeted by Lisa who offered up some masking tape for a name tag and sat me in the kitchen with a U of M law student and her boyfriend visiting from Boston, and Archie — a character active on the local food scene who was seemingly known by everyone in the room. I really wanted to take a picture of the meal, but was embarrassed with my new companions at the table. Shoulda, coulda, woulda. The conversation was lively and the food was divine. Volunteers help out in the kitchen and do the serving. The room was alive with chatter and animated discussions. There was plenty of Roos Roast coffee to go along with the meal and some mighty tasty whole grain bread. I may just become a regular!Thursday, April 16, 2009
The Sampler! It's not just for cross-stitch any more
 One of the projects I've been busy working away on is putting together a package for the Sampler. Every month they send out a box of -- yes, you guessed it -- samples -- to media contacts and subscribers. I've been hemming and hawing over whether to send prints or cards, or what, and finally got down to it this month. I decided on cards and have been printing and folding and cutting and labeling and sealing and reprinting for two days now and finally have it all packed up to go. Yippee! Wish me luck -- I'm off to the post office now.
Wednesday, April 15, 2009
It's syruping season
 My recent posts have been from the kitchen — or from the stomach — far more than from the drawing table. I am itching to be back at it but am tied up with some writing assignments and other projects I just can't seem to get past… but I know I will and have many ideas swarming around waiting to get out.
That said, here is one more for the belly. My lovely friend BE, who is my greatest recipe source ever, sent over this one from Chocolate and Zucchini right when I started spotting the maple taps around the neighborhood and fresh syrup at the farmers' market. I've been thinking about it since and decided to make it for Sam's birthday on Monday.
Apple and Maple Yogurt Cake
1 cup plain yogurt
1 cup minus 2 tablespoons finely ground maple sugar*, divided
2 eggs
1/3 cup vegetable oil
2 cups minus 2 tablespoons flour
1 1/2 teaspoons baking powder
1/2 teaspoon baking soda
a good pinch salt
one large apple of a variety that holds its shape when cooked (I used Golden Delicious)
1. Preheat the oven to 180° C (360° F) and line a 25-cm (10-inch) cake pan with parchment paper.
2. Set aside 1 rounded tablespoon of the maple sugar for topping.
3. In a medium mixing bowl, whisk together the yogurt, the remaining maple sugar, eggs, and oil. In another mixing bowl, combine the flour, baking powder, baking soda, and salt. Peel the apple, then core, quarter, and slice it thinly. Add the flour mixture to the yogurt mixture and whisk it in quickly, until just combined. Don't worry about lumps and do not overmix.
4. Pour the batter into the prepared pan, arrange the apple slices on top, starting from the outside, and sprinkle with the reserved maple sugar.
5. Put into the oven to bake for 40 minutes, until the top is golden and a cake tester inserted in the center comes out clean. If you feel the apple slices might be browning too quickly, cover with a piece of parchment paper.
6. Let cool on a rack and serve, warm or at room temperature.
* If maple sugar is unavailable, substitute 3/4 cup maple syrup and use just 3/4 cup yogurt to make up for the extra moisture.
Easy as cake! I used syrup with the lesser amount of yogurt as noted. And I only had 9" cake pans, so used my 10" cast iron skillet. It all comes together really quickly and is so tasty and moist.
We had just watched Ratatouille and the
Monday, April 13, 2009
DIY Cheese: Mozzarella
A while back my brother gave me a cheesemaking kit from Ricki the Cheese Queen of the New England Cheesemaking Supply Company in Massachusetts. It's a beginner set for mozzarella and ricotta since those are the most basic of cheeses to make at home. I finally made my first attempt on Saturday. I set up everything on the counter, like so:
 First step: mix citric acid into one gallon of milk and slowly heat to 90 degrees while stirring. Then remove pot from burner and stir in rennet solution (to make in coagulate). Let sit for five minutes while it sets. The curd begins to separate and form into a custard-like consistency. You then cut this into cubes inside the pot and reheat while stirring slowly.

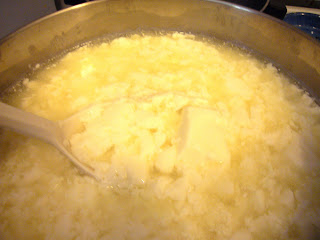 The curd breaks down again at this point, which made me nervous, but this is supposed to happen.
 You reheat the pot to 185 degrees and then ladle thecurds into a colander and strain out as much of the whey as possible. You then put curds back into a pot of hot water and let them heat up for stretching.
 Once they become a bit elastic from the heat, you pull them out of the water and stretch them. It is very hot, and the kit suggested wearing rubber gloves, but who has those lying around?! I put on some plastic bags and stretched away. This part was really fun and while Sam was trying to capture the process, I think I stretched it for too long. It made the end result a little tough. While you are doing this, you are supposed to mix in the cheese salt. I forgot until well into stretching, so again, kept stretching more. Oops!
 You then form it into whatever shape you want — I went for the straight up traditional ball o' cheese — and plunge it into ice water to set it into that shape.
 The cheese did in fact look like real mozzarella, but really it was a little tough and dry and definitely needed more salt. I think next time I will try to mix in some herbs, too. Not a great result, but it was only a first attempt and it was fun enough to try again!
 First step: mix citric acid into one gallon of milk and slowly heat to 90 degrees while stirring. Then remove pot from burner and stir in rennet solution (to make in coagulate). Let sit for five minutes while it sets. The curd begins to separate and form into a custard-like consistency. You then cut this into cubes inside the pot and reheat while stirring slowly.
 The curd breaks down again at this point, which made me nervous, but this is supposed to happen.
 You reheat the pot to 185 degrees and then ladle thecurds into a colander and strain out as much of the whey as possible. You then put curds back into a pot of hot water and let them heat up for stretching.
 Once they become a bit elastic from the heat, you pull them out of the water and stretch them. It is very hot, and the kit suggested wearing rubber gloves, but who has those lying around?! I put on some plastic bags and stretched away. This part was really fun and while Sam was trying to capture the process, I think I stretched it for too long. It made the end result a little tough. While you are doing this, you are supposed to mix in the cheese salt. I forgot until well into stretching, so again, kept stretching more. Oops!
 You then form it into whatever shape you want — I went for the straight up traditional ball o' cheese — and plunge it into ice water to set it into that shape.
 The cheese did in fact look like real mozzarella, but really it was a little tough and dry and definitely needed more salt. I think next time I will try to mix in some herbs, too. Not a great result, but it was only a first attempt and it was fun enough to try again!
Sunday, April 12, 2009

Subscribe to:
Posts (Atom)