Friday, May 07, 2010

A doughnut AND a muffin

Doughnut Muffin Recipe
The butter has thawed and as promised, I made these doughnut muffins for you on this rainy spring day. They were worth the wait. The recipe has been floating around the food blog circuit for some time now — each tempting me a little bit more. I went with the Lottie & Doof version since he cuts it down to a reasonable 12 muffins. So without further ado…

Doughnut Muffin RecipeDoughnut Muffin Recipe

Doughnut Muffins

Makes 10 to 12.
12 Tb unsalted butter
3/4 cup sugar
2 large eggs
3 cups all-purpose flour
2 1/2 tsp baking powder
1/4 tsp baking soda
3/4 tsp salt
1/2 tsp ground nutmeg
3/4 cup whole milk
1/4 cup buttermilk

Topping:
4 Tb unsalted butter, melted
3/4 cup granulated sugar
3/4 Tb cinnamon

Preheat the oven to 350° F. Grease and flour a standard-size muffin tin.

In a stand mixer fitted with the paddle attachment, cream the butter and sugar — or cream with a wooden spoon by swiping sugar into butter against the side of the bowl. Beat in eggs, one at a time, until just mixed in.

Sift together the flour, baking powder, baking soda, salt, and nutmeg. Combine the milk and buttermilk. With a wooden spoon, mix a quarter of the dry ingredients into the butter mixture. Next mix in a third of the milk mixture. Continue mixing in the remaining dry and wet ingredients alternately, ending with the dry. Mix until well combined and smooth, but don’t overmix.

Scoop enough batter into each tin so that the top of the batter is even with the rim of the cup, about 1/2 cup. If you don't have enough batter for twelve muffins — I only had ten — fill empty holes in the pan halfway wth water before baking. This will ensure that it all bakes evenly.

Bake the muffins until firm to the touch, 30-35 minutes.

For the topping: Combine the sugar and cinnamon in a small bowl. When the muffins are just cool enough to handle, remove them from the tin, brush them all over with melted butter and roll them in the cinnamon sugar.

Doughnut Muffin Recipe
Enjoy hot from the oven!

Happy Friday — have a great weekend!

Thursday, May 06, 2010

I wanted to give you donuts, but all I have are …


Whoa is me, the butter is frozen.


I've barely been able to get a full meal on the table this week and haven't shared a single recipe with you yet. I said I would. All morning long I was stewing about it and finally I knew just what I would make for you: doughnut muffins. I haven't had many recipes jumping out at me, begging to be made lately. But this one was softly, quietly calling my name. Doughnut muffins. I knew the ingredients are mostly basics that I would have on hand and felt I owed it to you to bake up a batch. I raced home this afternoon to make them just for you, lickety-split. But…

The butter — all 12 tablespoons of it — is frozen.

And so I give you … peas.


Inspired by Jen of Indie Fixx's post over at Craft, I put together a makeshift trellis for our snap peas last night. You can find full instructions here. I used some twigs I found around the yard and tied it all to our balcony. Voila! Instant trellis.


So just know that I have been thinking of you and, tomorrow, for you: doughnut muffins. It'll be Friday and it will be worth it!

Wednesday, May 05, 2010

Naturally inspired


Yesterday I had a chance to visit the Museum of Natural History at the University of Michigan. I was looking for some inspiration and happily found it. I especially loved the second floor's displays of Michigan wildlife — they feel somehow quaint yet really beautiful. They also have some bizarrely cool, yet somewhat disturbing displays on taxidermy as well as lots of rattlesnake heads and mice floating in jars. I'll spare you those, though I was fascinated. Here are some of the other highlights:


The requisite dinosaur.


The cabinet of curiosities. (Yes, really.)


A very solid looking armadillo.

Eerily lifelike snowshoe bunny.

Check out the patterning on this fossil.

Signage: "These mice are important to humans as a
host of the tick that transmits Lyme disease."

I'm not sure "important" is the word I'd use.

And — to top it all off, so to speak — the ceiling in
the rotunda when you enter is stunning.

Tuesday, May 04, 2010

Now I Can Say I've Tried It: Fiddleheads

fiddlehead fernsfiddlehead ferns
These swirly green beauties are fiddlehead ferns. Harvested low to the ground before they unfurl to become full-grown ferns, fiddleheads are a brief seasonal wonder. Apparently they are a traditional spring dish in New England — particularly Maine — though I had never heard about them until moving to Michigan. Last spring I was convinced I could find some to harvest on my own, but never did. (Sadly no morels either — one day!) This year, I went the easy route and snagged some yesterday at the coop in town.

fiddlehead ferns
I poked around a little on the interwebs and ended up doing a simple saute with butter, garlic and red pepper flakes. Then, poking around a little more this morning found that there are some crazy toxins in fiddleheads. They (the infamous they) recommend boiling for at least ten minutes or steaming for twenty. Oops. So please, if the blog goes quiet for more than two days this week, please call the authorities to recover my body!

sauteed fiddlehead ferns
Anyway, despite the toxins, the fiddleheads were quite tasty. Mild, almost asparagus-y but with a little nuttiness. Here's my revised, non-toxic recipe:

Sauteed Fiddlehead Ferns
2 tsp salt, plus more to taste
1/2 pound fiddlehead ferns
1 Tb. butter
2 cloves garlic, thinly sliced
1/4 tsp. red pepper flakes (optional)

Trim any brown ends or mushy parts. Fill a large bowl and add fiddleheads. Stir well to remove any grit. Drain and repeat.

Bring a large pot of water to a boil. Add salt and fiddleheads. Cook 1-2 minutes. Drain and rinse with cold water.

In a large frying pan, heat oil over medium-high heat. Add fiddleheads. Cook, stirring, until they start to brown, about 5-6 minutes. Add garlic and red pepper flakes, if using, and cook, stirring, until garlic is fragrant and just starting to color, about 1 minute. Salt to taste. Serve immediately.

Friday, April 30, 2010

An American Icon: Stanley Thermos

Stanley Thermos
Who knew Stanley was so iconic? Certainly when I sat down to draw the thermos we use every day for coffee, I admired its classic design. But I had no idea it was such an icon and that the feeling was so pervasive. I've had so many people squeal a little and say, "That's exactly the thermos my dad carried/carries to work." At first I thought it was a Midwest thing, but I've since had orders from Seattle and beyond, with a "That's the exact thermos we have in our office."

I did a quick Google search for Stanley this morning and lo and behold, I received confirmation of his iconic stature: You can now buy a Stanley thermos at
Design Within Reach for $42 — or the same Stanley thermos at Larry's Pistol and Pawn for $20.90. (Leading me to ask, of course, design within who's reach? But that's a-whole-nother discussion for another day.) Perhaps I should write and see if either shop would like a print to hang above their Stanley display. If you're a DWR executive, or Larry, feel free to pick up a print here in my Etsy shop! Whaddya think?


Have a wonderful weekend! If your in Flint, stop by and check out the Flint Handmade spring craft market. And I'll be back next week with some tasty treats from the kitchen — promise!

Wednesday, April 28, 2010

Now I Can Say I've Tried It: Ugli Fruit

I'm a sucker for citrus. As much as I like to stock up on local produce, sometimes I can't resist the call of the wild. In this case it was an ugly Ugli. Well, a Uniq ugli to be exact. When I picked this 5" baby up, it had a label on it that said Uniq, which is apparently one of the growers of Ugli fruit. The Ugli grow wild in Jamaica (really now!) and is said to be a cross citrusy cross between an orange, a tangerine and a grapefruit.

The thick skin peels away so easily revealing the unexpectedly orange insides. Super juicy and sweet like and orange with just a slight puckery tang of tart. Delicious!

Check out my other recent discoveries here, here and here.


Tuesday, April 27, 2010

Garden Balcony Update 04.27.10

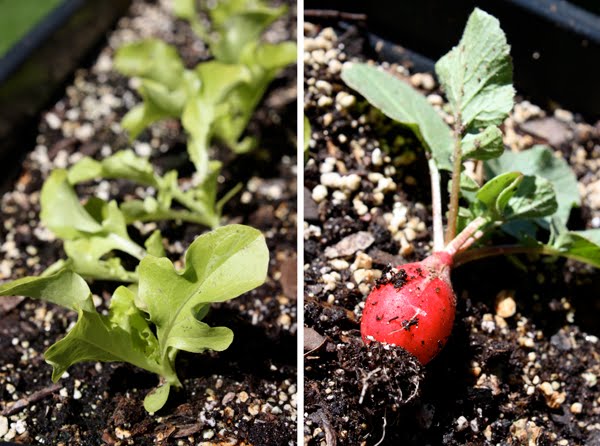
Lettuce and first radish of the season

There is a definite chill in the air today, but nonetheless, the sun is out and the balcony garden continues to grow. I ate my first radish today and had chives in my omelet. There is plenty of spinach just ripe for the picking. See? You really can grow some food for yourself — even in an apartment!


Snap peas

Spinach

Our strawberry plant came back from last year —
in a window box — and is showing its first little flower.


The poppies are growing like crazy. I keep thinning them, but can't keep up!

Radishes and carrots share a half bushel basket.

Chives and dill.

Okay, so I didn't grow the chives myself. I was at Tollgate Farm in Novi recently and the chives were crowding out the walkways in the vegetable garden and creeping into every bed. A kind soul took pity on me and plopped a whole bush of them in a pot and — voila! I have a huge gallon of chives. Yippee! What are you growing at home?

Monday, April 26, 2010

Cutting it up in the kitchen

Yesterday the boy and I learned how to carve it up in the kitchen. Rebecca Pelletier Doyle, an Old Pine Farm CSA member and student at Schoolcraft Culinary School, volunteered to run a workshop on cooking with chicken. Every month we receive a whole chicken from the farm and while I could, in theory, hack it up into bits, this class showed us how to do so with grace. Well, maybe that's an exaggeration, but we did learn how to get the most meat off the bones intact and ready for cooking. Rebecca also demonstrated a few recipes along the way.

The class started with quite a few looks like this. What the…? Huh?!

But Rebecca was very patient, giving us great tips and technique.

Somehow, we even managed to do this.

The lesson included frenching the breast, finding the oyster and lopping off wings. Need I say more?! Thanks so much to Rebecca — and to Kris of Old Pine Farm for organizing it!

Friday, April 23, 2010

Didn't get enough green on Earth Day?

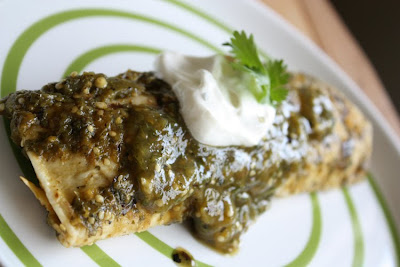
Chicken Enchiladas VerdesDidn't get enough green during yesterday's Earth Day festivities? How about cooking up some green in the kitchen with these Chicken Enchiladas Verdes. They are so good I made them twice this week, and ate them for lunches! The sauce and flavor combo is just that tasty.

Chicken Enchiladas Verdes
Adapted from Martha Stewart Living

1 1/2 pounds bone-in chicken breast halves, skin removed
1/2 medium white onion, halved crosswise
1 whole garlic clove
1 Tb olive oil
2 garlic cloves, minced
1 tsp ground cumin
1/2 teaspoon coarse salt
2 cups loosely packed fresh cilantro
1 1/2 pounds tomatillos, husked and rinsed
1 jalapeno
1 poblano chile
8 six-inch flour tortillas (or corn, whichever you prefer)
1 cup Monterey Jack cheese, grated (about 2 oz)
1/2 cup sour cream, thinned with 2 TB water

Place chicken, 1/2 of the onion, the garlic, and 1/4 teaspoon salt in a medium saucepan. Add enough water to cover by at least 1 inch. Bring to a boil, and then reduce heat. Simmer until chicken is cooked through, 18 to 22 minutes.

Meanwhile, heat oil over moderate heat. Add minced garlic and onion and saute until onion is tender, about 6 to 8 minutes. Add cumin and continue to cook 2 to 3 minutes. Remove from heat.

When chicken is done, remove to a plate and let cool. Reserve 3/4 cup of the cooking liquid; set aside. (I used boneless chicken breasts, so at this point added a bit of bouillion for extra flavor.) When the chicken is cool enough to handle, discard bones and shred with two forks. Coarsely chop 1/2 cup cilantro, and add it along with the onion-garlic mixture. Toss well to combine.

Preheat broiler, with the rack about 6 inches from heat source. Broil tomatillos and chiles on a rimmed baking sheet, rotating them as they blacken, 10 to 12 minutes. Let cool. Remove the blackened skins, stems, ribs, and seeds (optional) from chiles. Reduce oven temperature to 375 degrees.

Coarsely puree tomatillos and chiles in blender with remaining 1/4 teaspoon salt, remaining 1 1/2 cups cilantro, and reserved 3/4 cup cooking liquid. Transfer salsa to a large bowl.

Heat a tortilla in a dry skillet over high heat for 5 to 10 seconds per side. Dip the tortilla into salsa to coat lightly. Place 1/3 cup chicken on half of tortilla. Sprinkle 2 tablespoons cheese on top, and roll up tightly. Place it seam side down in a 9-by-13-inch baking dish. Repeat to make more enchiladas, lining them up snugly in dish. Spoon remaining salsa on top, and bake until heated through, about 20 minutes.

Drizzle with sour cream and serve.
Try the sauce with chips, too!

Chicken Enchiladas Verdes

Thursday, April 22, 2010

Happy Earth Day!

Remake Earth Day event at Blue House Ann Arbor Come on out this Saturday for Re-Make, a FREE Earth Day event at the Blue House in Ann Arbor! There will be live music from Joe Reilly, hands-on eco-craft activities, demos and more. It runs from 3 to 6 p.m. and will be packed with family-friendly fun - so come on down!

Indie Fixx Earth Day giveaway
Also, head on over to Indie Fixx right now because it's the last day to enter the Indie Fixx Earth Day giveaway. There are two prize options with lots of green goodies, including a print and note pad from me - yay! Don't you wanna be a winner?!?!

Wednesday, April 21, 2010

Cincinnati is hot!

I had such fun at the Crafty Supermarket. I met some terrific people and was inspired by all of them — they are not just makers, but doers. Drawing, painting, business-owning, sewing, organizing, DJing, writing doers. Oh yay, and that's in addition to full time jobs. The organizers in particular, Grace, Alisha and Chris, were incredibly gracious, organized, fun and inspiring! Of course, I rarely left my table because it was crazy busy, but here is just a wee peak…

I met the lovely Jess from Paper Acorn — I wasn't quick enough to snatch up one of her paper bird boxes. They sold out in a flash!

My view for the day was of these fantastical creatures, or "hand-crafted curiosities" from Lori Brown of Morninglori.

I also got to check out Fabricate on Sunday, a new Cincinnati shop run by my hostess and all-around extraordinary lady, Chris Salley along with her business partner. They have all kinds of goodies from local makers, as well as a gallery space. The current exhibit is from a local high school class — I love the community feel of the whole place, not to mention the turquoise!

Did I mention I ate some awesome food, too? Yummy sandwiches at Melt, sushi at Kosho and shrimp and grits at Take the Cake, all in Northside. Now I know where to go for a little piece of urban inspiration! They know how to get things done in Cincinnati.

Monday, April 19, 2010

I think I would like them: They Draw and Cook

They Draw and Cook
Vegetable Stock by Nate Padavick

Hello! I want to tell you all about my new favorite city: Cincinnati. I had a great weekend there for Crafty Supermarket, but I'm still catching up with things and it will have to wait until tomorrow. In the meantime, I wanted to share this terrific blog that features two of my favorite things -- drawing and food -- together in one place. It is called They Draw and Cook and I discovered it through Ann Arbor artist Peter Breese. The site, run by Nate Padavick and Sally Swindell, invites artists, illustrators and designers to submit drawings of recipes. It's so fun to scroll through the entries and read the recipes. I can't wait to enter a recipe or two of my own! Thanks, Peter!

They Draw and Cook Sushi by Dante Terzigni

Friday, April 16, 2010

Fritillaria Friday

fritillaria
Happy weekend! It's been a long week and I'm off to Cincinnati for the Crafty Supermarket this Saturday. I'm leaving you with these flowers to enjoy. Both are Fritillaria which is from the Lily family. Aren't they cool looking? I bought them last fall because they're deer-resistant but had never seen one. Wow!

Thursday, April 15, 2010

Casting off: Knitting at the Blue House

knitting at Blue House Ann ArborDoesn't she look like an old pro? Rory was one of the students in my first Knit One/Intro to Knitting workshop at the Blue House last week. In just two hours she, along with Julie and Kaylee, were casting on, knitting, casting off like they were born to it. We even got to some purling and laughing. I'm pretty sure they would all do it again. There's another workshop coming up next Friday evening, so if you're in the area and looking to learn how to knit, why not join us? Stay tuned for more dates or you can check out the Blue House web site for more workshops and info.

knitting at Blue House Ann Arbor

Wednesday, April 14, 2010

It started with a clam bake and ended with a cheesecake

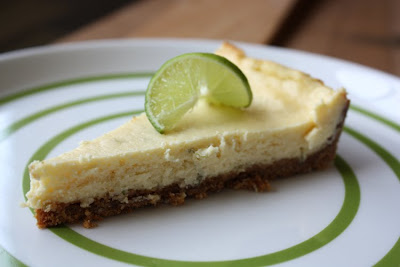
I've always wanted to host a real, full-on clam bake for my birthday. Hot coals and seaweed buried deep in the sand with tons of fresh seafood — the whole nine yards. Maybe that's what sparked it, I'm not really sure, but for some reason when we first started dating the boy and I ended up in a little seafood place on Long Island eating a restaurant-style full-on clambake. There was lobster and clams and shrimp and potatoes and corn on the cob and I can't even remember what all. We grinned at each other goofily over lobster bibs and stuffed ourselves silly. The waitress came and offered up an endless list of pies at the end of the meal and my eyes glazed over. But the boy kept going and ordered up a slice of Key lime cheesecake. I told him that he should just go to town because I don't like Key Lime pie and I don't really even like cheesecake. Knock yourself out, I said. Famous last words, of course, cuz that pie knocked the boy out and then it came for me. Bowled us over. Best ever. So, I had to learn to make to further impress the boy and now it gets carted out for just about all special occasions. And yesterday was a special occasion. It was the boy's birthday. The big 4-0. Wowsa. That's old. So old, he deserved a Key Lime pie.


Key Lime Cheesecake
Adapted from Bon Appetit

For the crust:
  • 1 3/4 cups graham cracker crumbs (about 12 whole graham crackers)
  • 1/4 cup sugar
  • 1/2 teaspoon salt
  • 1/2 cup (1 stick) unsalted butter, melted

Preheat oven to 350°F. Stir first 3 ingredients to blend in medium bowl. Mix in butter until moistened. Press crumb mixture evenly onto bottom and 1 1/2 inches up sides of 9-inch-diameter springform pan. Bake just until set and golden brown, about 5-10 minutes. Cool completely. Stack 3 large sheets of 18-inch-wide heavy-duty foil on work surface. Place cake pan in center. Wrap foil snugly around pan sides. Maintain oven temperature.

For the filling:
3 8-ounce packages cream cheese, room temperature
1/2 cup sour cream
1 cup sugar
5 large eggs
3 tablespoons fresh Key lime juice
2 teaspoons finely grated Key lime peel
3/4 teaspoon vanilla extract

Using electric mixer, beat cream cheese in large bowl until smooth. Beat in sour cream, then sugar. Beat in eggs 1 at a time, occasionally scraping down sides of bowl. Beat in lime juice, lime peel, and vanilla. Pour batter over crust. Place wrapped cheesecake in large roasting pan. Pour enough hot water into roasting pan to come halfway up sides of cheesecake pan. Cover cheesecake pan (not roasting pan) loosely with foil.


Place cheesecake, still in water bath, into oven. Bake 1 hour. Uncover and continue to bake until just set in center when cake pan is gently shaken, about 20 minutes longer. Remove cake from water and place directly into refrigerator; chill uncovered overnight.


Cut around cake to loosen. Remove pan sides.


I've made this in all kinds of kitchen and it can be easily improvised. Only have pie plates? Great! This filling amount will make two 9-inch pies. Same with a tart pan (as seen above). If you can't find key limes, go ahead and use regular, but double the zest. Don't have a roasting pan? Use a baking sheet, but check the water levels while cooking as it will evaporate quickly.

Happy birthday to the boy!

Monday, April 12, 2010

The ultimate microgreen salad

Last year I wrote about my difficulties with thinning plants out effectively. I know, ridiculous. I'm issue-ridden over sprouts. But there it is. My friend, BE, sympathized and told me that she leaves hers on the lawn for the rabbits. But being in an apartment complex, we don't have a whole slew of rabbits — or lawn for that matter. This year, I vowed to harden myself and yank away at the little buggers. Then it came time and I waffled. So I came up with a better plan: we would have the world's microest of microgreen salads. I felt much better about pulling them out knowing they would be eaten, even though I knew all along that I was giving the other little plants a better chance of growing up to be big and tall and healthy. Parsley, cilantro, dill, spinach, radish and wee little lettuce sproutlets — roots and all, with a couple rings of scallions thrown in for good measure. No dressing required. I highly recommend it.