Tuesday, April 27, 2010

Garden Balcony Update 04.27.10

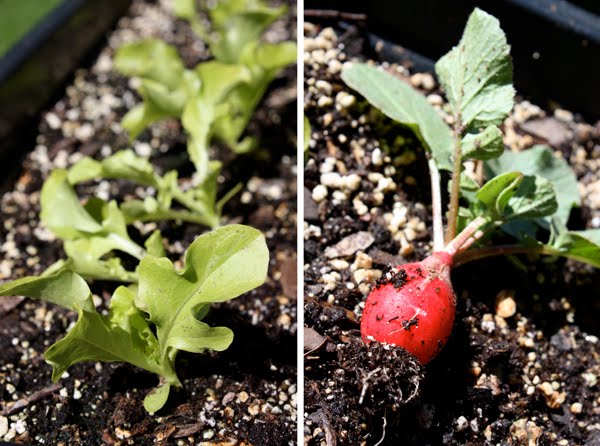
Lettuce and first radish of the season

There is a definite chill in the air today, but nonetheless, the sun is out and the balcony garden continues to grow. I ate my first radish today and had chives in my omelet. There is plenty of spinach just ripe for the picking. See? You really can grow some food for yourself — even in an apartment!


Snap peas

Spinach

Our strawberry plant came back from last year —
in a window box — and is showing its first little flower.


The poppies are growing like crazy. I keep thinning them, but can't keep up!

Radishes and carrots share a half bushel basket.

Chives and dill.

Okay, so I didn't grow the chives myself. I was at Tollgate Farm in Novi recently and the chives were crowding out the walkways in the vegetable garden and creeping into every bed. A kind soul took pity on me and plopped a whole bush of them in a pot and — voila! I have a huge gallon of chives. Yippee! What are you growing at home?

Monday, April 26, 2010

Cutting it up in the kitchen

Yesterday the boy and I learned how to carve it up in the kitchen. Rebecca Pelletier Doyle, an Old Pine Farm CSA member and student at Schoolcraft Culinary School, volunteered to run a workshop on cooking with chicken. Every month we receive a whole chicken from the farm and while I could, in theory, hack it up into bits, this class showed us how to do so with grace. Well, maybe that's an exaggeration, but we did learn how to get the most meat off the bones intact and ready for cooking. Rebecca also demonstrated a few recipes along the way.

The class started with quite a few looks like this. What the…? Huh?!

But Rebecca was very patient, giving us great tips and technique.

Somehow, we even managed to do this.

The lesson included frenching the breast, finding the oyster and lopping off wings. Need I say more?! Thanks so much to Rebecca — and to Kris of Old Pine Farm for organizing it!

Friday, April 23, 2010

Didn't get enough green on Earth Day?

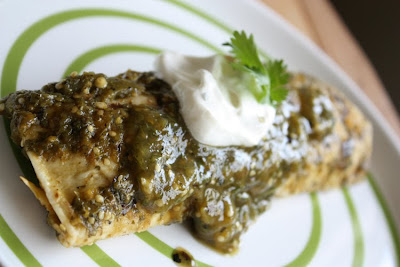
Chicken Enchiladas VerdesDidn't get enough green during yesterday's Earth Day festivities? How about cooking up some green in the kitchen with these Chicken Enchiladas Verdes. They are so good I made them twice this week, and ate them for lunches! The sauce and flavor combo is just that tasty.

Chicken Enchiladas Verdes
Adapted from Martha Stewart Living

1 1/2 pounds bone-in chicken breast halves, skin removed
1/2 medium white onion, halved crosswise
1 whole garlic clove
1 Tb olive oil
2 garlic cloves, minced
1 tsp ground cumin
1/2 teaspoon coarse salt
2 cups loosely packed fresh cilantro
1 1/2 pounds tomatillos, husked and rinsed
1 jalapeno
1 poblano chile
8 six-inch flour tortillas (or corn, whichever you prefer)
1 cup Monterey Jack cheese, grated (about 2 oz)
1/2 cup sour cream, thinned with 2 TB water

Place chicken, 1/2 of the onion, the garlic, and 1/4 teaspoon salt in a medium saucepan. Add enough water to cover by at least 1 inch. Bring to a boil, and then reduce heat. Simmer until chicken is cooked through, 18 to 22 minutes.

Meanwhile, heat oil over moderate heat. Add minced garlic and onion and saute until onion is tender, about 6 to 8 minutes. Add cumin and continue to cook 2 to 3 minutes. Remove from heat.

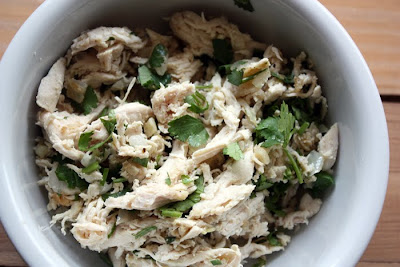
When chicken is done, remove to a plate and let cool. Reserve 3/4 cup of the cooking liquid; set aside. (I used boneless chicken breasts, so at this point added a bit of bouillion for extra flavor.) When the chicken is cool enough to handle, discard bones and shred with two forks. Coarsely chop 1/2 cup cilantro, and add it along with the onion-garlic mixture. Toss well to combine.

Preheat broiler, with the rack about 6 inches from heat source. Broil tomatillos and chiles on a rimmed baking sheet, rotating them as they blacken, 10 to 12 minutes. Let cool. Remove the blackened skins, stems, ribs, and seeds (optional) from chiles. Reduce oven temperature to 375 degrees.

Coarsely puree tomatillos and chiles in blender with remaining 1/4 teaspoon salt, remaining 1 1/2 cups cilantro, and reserved 3/4 cup cooking liquid. Transfer salsa to a large bowl.

Heat a tortilla in a dry skillet over high heat for 5 to 10 seconds per side. Dip the tortilla into salsa to coat lightly. Place 1/3 cup chicken on half of tortilla. Sprinkle 2 tablespoons cheese on top, and roll up tightly. Place it seam side down in a 9-by-13-inch baking dish. Repeat to make more enchiladas, lining them up snugly in dish. Spoon remaining salsa on top, and bake until heated through, about 20 minutes.

Drizzle with sour cream and serve.
Try the sauce with chips, too!
Chicken Enchiladas Verdes

Thursday, April 22, 2010

Happy Earth Day!

Remake Earth Day event at Blue House Ann Arbor Come on out this Saturday for Re-Make, a FREE Earth Day event at the Blue House in Ann Arbor! There will be live music from Joe Reilly, hands-on eco-craft activities, demos and more. It runs from 3 to 6 p.m. and will be packed with family-friendly fun - so come on down!

Indie Fixx Earth Day giveaway
Also, head on over to Indie Fixx right now because it's the last day to enter the Indie Fixx Earth Day giveaway. There are two prize options with lots of green goodies, including a print and note pad from me - yay! Don't you wanna be a winner?!?!

Wednesday, April 21, 2010

Cincinnati is hot!

I had such fun at the Crafty Supermarket. I met some terrific people and was inspired by all of them — they are not just makers, but doers. Drawing, painting, business-owning, sewing, organizing, DJing, writing doers. Oh yay, and that's in addition to full time jobs. The organizers in particular, Grace, Alisha and Chris, were incredibly gracious, organized, fun and inspiring! Of course, I rarely left my table because it was crazy busy, but here is just a wee peak…

I met the lovely Jess from Paper Acorn — I wasn't quick enough to snatch up one of her paper bird boxes. They sold out in a flash!

My view for the day was of these fantastical creatures, or "hand-crafted curiosities" from Lori Brown of Morninglori.

I also got to check out Fabricate on Sunday, a new Cincinnati shop run by my hostess and all-around extraordinary lady, Chris Salley along with her business partner. They have all kinds of goodies from local makers, as well as a gallery space. The current exhibit is from a local high school class — I love the community feel of the whole place, not to mention the turquoise!

Did I mention I ate some awesome food, too? Yummy sandwiches at Melt, sushi at Kosho and shrimp and grits at Take the Cake, all in Northside. Now I know where to go for a little piece of urban inspiration! They know how to get things done in Cincinnati.

Monday, April 19, 2010

I think I would like them: They Draw and Cook

They Draw and Cook
Vegetable Stock by Nate Padavick

Hello! I want to tell you all about my new favorite city: Cincinnati. I had a great weekend there for Crafty Supermarket, but I'm still catching up with things and it will have to wait until tomorrow. In the meantime, I wanted to share this terrific blog that features two of my favorite things -- drawing and food -- together in one place. It is called They Draw and Cook and I discovered it through Ann Arbor artist Peter Breese. The site, run by Nate Padavick and Sally Swindell, invites artists, illustrators and designers to submit drawings of recipes. It's so fun to scroll through the entries and read the recipes. I can't wait to enter a recipe or two of my own! Thanks, Peter!

They Draw and Cook Sushi by Dante Terzigni

Friday, April 16, 2010

Fritillaria Friday

fritillaria
Happy weekend! It's been a long week and I'm off to Cincinnati for the Crafty Supermarket this Saturday. I'm leaving you with these flowers to enjoy. Both are Fritillaria which is from the Lily family. Aren't they cool looking? I bought them last fall because they're deer-resistant but had never seen one. Wow!

Thursday, April 15, 2010

Casting off: Knitting at the Blue House

knitting at Blue House Ann ArborDoesn't she look like an old pro? Rory was one of the students in my first Knit One/Intro to Knitting workshop at the Blue House last week. In just two hours she, along with Julie and Kaylee, were casting on, knitting, casting off like they were born to it. We even got to some purling and laughing. I'm pretty sure they would all do it again. There's another workshop coming up next Friday evening, so if you're in the area and looking to learn how to knit, why not join us? Stay tuned for more dates or you can check out the Blue House web site for more workshops and info.

knitting at Blue House Ann Arbor

Wednesday, April 14, 2010

It started with a clam bake and ended with a cheesecake

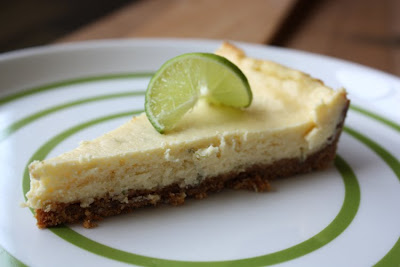
I've always wanted to host a real, full-on clam bake for my birthday. Hot coals and seaweed buried deep in the sand with tons of fresh seafood — the whole nine yards. Maybe that's what sparked it, I'm not really sure, but for some reason when we first started dating the boy and I ended up in a little seafood place on Long Island eating a restaurant-style full-on clambake. There was lobster and clams and shrimp and potatoes and corn on the cob and I can't even remember what all. We grinned at each other goofily over lobster bibs and stuffed ourselves silly. The waitress came and offered up an endless list of pies at the end of the meal and my eyes glazed over. But the boy kept going and ordered up a slice of Key lime cheesecake. I told him that he should just go to town because I don't like Key Lime pie and I don't really even like cheesecake. Knock yourself out, I said. Famous last words, of course, cuz that pie knocked the boy out and then it came for me. Bowled us over. Best ever. So, I had to learn to make to further impress the boy and now it gets carted out for just about all special occasions. And yesterday was a special occasion. It was the boy's birthday. The big 4-0. Wowsa. That's old. So old, he deserved a Key Lime pie.


Key Lime Cheesecake
Adapted from Bon Appetit

For the crust:
  • 1 3/4 cups graham cracker crumbs (about 12 whole graham crackers)
  • 1/4 cup sugar
  • 1/2 teaspoon salt
  • 1/2 cup (1 stick) unsalted butter, melted

Preheat oven to 350°F. Stir first 3 ingredients to blend in medium bowl. Mix in butter until moistened. Press crumb mixture evenly onto bottom and 1 1/2 inches up sides of 9-inch-diameter springform pan. Bake just until set and golden brown, about 5-10 minutes. Cool completely. Stack 3 large sheets of 18-inch-wide heavy-duty foil on work surface. Place cake pan in center. Wrap foil snugly around pan sides. Maintain oven temperature.

For the filling:
3 8-ounce packages cream cheese, room temperature
1/2 cup sour cream
1 cup sugar
5 large eggs
3 tablespoons fresh Key lime juice
2 teaspoons finely grated Key lime peel
3/4 teaspoon vanilla extract

Using electric mixer, beat cream cheese in large bowl until smooth. Beat in sour cream, then sugar. Beat in eggs 1 at a time, occasionally scraping down sides of bowl. Beat in lime juice, lime peel, and vanilla. Pour batter over crust. Place wrapped cheesecake in large roasting pan. Pour enough hot water into roasting pan to come halfway up sides of cheesecake pan. Cover cheesecake pan (not roasting pan) loosely with foil.


Place cheesecake, still in water bath, into oven. Bake 1 hour. Uncover and continue to bake until just set in center when cake pan is gently shaken, about 20 minutes longer. Remove cake from water and place directly into refrigerator; chill uncovered overnight.


Cut around cake to loosen. Remove pan sides.


I've made this in all kinds of kitchen and it can be easily improvised. Only have pie plates? Great! This filling amount will make two 9-inch pies. Same with a tart pan (as seen above). If you can't find key limes, go ahead and use regular, but double the zest. Don't have a roasting pan? Use a baking sheet, but check the water levels while cooking as it will evaporate quickly.

Happy birthday to the boy!

Monday, April 12, 2010

The ultimate microgreen salad

Last year I wrote about my difficulties with thinning plants out effectively. I know, ridiculous. I'm issue-ridden over sprouts. But there it is. My friend, BE, sympathized and told me that she leaves hers on the lawn for the rabbits. But being in an apartment complex, we don't have a whole slew of rabbits — or lawn for that matter. This year, I vowed to harden myself and yank away at the little buggers. Then it came time and I waffled. So I came up with a better plan: we would have the world's microest of microgreen salads. I felt much better about pulling them out knowing they would be eaten, even though I knew all along that I was giving the other little plants a better chance of growing up to be big and tall and healthy. Parsley, cilantro, dill, spinach, radish and wee little lettuce sproutlets — roots and all, with a couple rings of scallions thrown in for good measure. No dressing required. I highly recommend it.

Friday, April 09, 2010

Gnocchi alla Romana

My kitchen has been filled with flops recently. The latest was Gnocchi alla Romana from Heidi Swanson's cookbook, Super Natural Cooking. Boiled down to basics, you make a firm semolina-based dough that is cooled and then cut into rounds and baked. Firm being the key. It didn't go well. I was distracted and didn't heat the milk enough or cook the semolina enough. The semolina never became firm, it just remained a mushy pile of mush. I put it in the refrigerator hoping it would firm up overnight and we ordered a pizza.


Gnocchi alla romanaRound two: By the next evening, the dough was still a pile of mush. I threw the whole thing back in a pot and cooked it some more hoping it would thicken. I put it in the refrigerator to cool and, determined to have gnocchi alla Romana that night, I started a second batch using Mario Batali's recipe as a guide. I knew the recipe wasn't the problem and knew what I had done wrong, but still wanted some other guidance.

While I was doing this, the first batch was sitting in the fridge, all mushy and gooey. It never set. I took it out, scooped it by the handful and formed little balls, pressing them into disc-like rounds. I baked these according to the recipe and then baked the second batch that had actually worked properly. Both had their winning moments. I've combined what I liked about each here.

Roman-style Gnocchi: Gnocchi Alla Romana

Adapted from Mario Batali and Heidi Swanson's Super Natural Cooking

3 cups milk
1 teaspoon salt
4 TB unsalted butter, plus more for greasing pans
1 1/2 cup semolina flour
1/2 cup freshly grated Parmigiano-Reggiano, plus 1/2 cup
4 egg yolks


Preheat the oven to 400ºF.

Butter 1 cookie sheet with 3/4-inch sides and an 8x8" or slightly larger baking dish.

In a large saucepan, heat milk, butter and salt over medium-high heat until it is simmer steadily. It will froth up pretty quickly, so keep an eye on things and stir frequently. Gradually pour in the semolina in a thin stream, whisking vigorously, and cook for a minute or two until it thickens quite a bit and starts to separate from the sides of the pan, switching to a wooden spoon as it thickens. You want it to be quite thick so that it can be cut easily in a solid form once cool. Remove from the heat and stir in 1/2 cup grated cheese and 4 egg yolks. Mix well to combine, working quickly so the eggs don't set. Pour mixture onto the buttered cookie sheet and, using a spatula, spread to a thickness of 1/2-inch. Allow to cool 10 minutes or so. Semolina should be firm to the touch.

Using a biscuit cutter or water glass, cut 2- or 3-inch rounds out of semolina. Arrange them in the buttered baking dish so that each round is slightly overlapping the one before it. Sprinkle with remaining grated cheese and bake, covered with foil or a lid, for 25 minutes. Remove cover and bake for 20 to 25 minutes more until top is deep golden brown. Remove and serve immediately with a marinara or sauce of your choice. I used Heidi Swanson's Bright Red Tomato Sauce as shown in this post.

Gnocchi alla romanaPlease don't be dissuaded by my failed attempts! It's actually quite easy and both recipes — and Heidi's cookbook in particular‚ are worth checking out.

Thursday, April 08, 2010

Spring indie crafts show and tell…

Grab your cart and let's go, people — It's show time!


Crafty supermarket
I'm extremely excited to be headed to Cincinnati, Ohio next weekend for the Crafty Supermarket. It will be on Saturday, April 17, 2010 from 11 a.m. to 6 p.m. at the Clifton Cultural Arts Center. They've been doing previews of the vendors who will be there over on the Crafty Supermarket blog and I can't wait to check out so many makers that are new to me.

I've also been scoping out the city using the Design*Sponge Cincinnati guide and simply can not wait to do some wandering. Apparently it used to be called the "Paris of the Midwest," has tons of great architecture and was home to the awe-inspiring illustrator, Charley Harper. (His work is worthy of a post all its own, but in the meantime, check out the beautiful poster for the Art in the Park show below for some gorgeous Charley Harper-inspired design. It was designed by the lovely and talented Marcy Davy of All Things Grow). Let me know if you have any recommendations for me while i'm in Cincinnati — shops, sites, restaurants, etc. — I'd love to hear from you!

If you've never used the Design*Sponge guides, they're such a great resource. I found so many great restaurants and stores in the Wilmington, NC guide when my parents moved there last year, not to mention the amazing Detroit guide by Sweet Juniper that I still refer to for this area. And speaking of Detroit… If you're in the Detroit area next weekend, be sure to check out Handmade Detroit's Craft Revival Saturday, April 17 at the Loving Touch in Ferndale. I'm sad to be missing that one, but you should go for sure!

But wait, there's more, shoppers!


Flint Handmade spring craft market
I will also a vendor on May 1, 2010 at the Flint Handmade Spring Craft Market from 10 a.m. to 4 p.m. in — you guessed it — Flint! flintHANDMADE is a collective of crafters actively encouraging the community to support creative expression and commerce in Flint by making and purchasing local handmade goods — so come on out and purchase some local handmade goodness! The show will be in four buildings along S. Saginaw Street: The Lunch Studio, Brown Sugar Cafe, Wize Guys Pizza and The Loft. And if the weather is nice, there will be more vendors outside each location, too.


Ypsilanti Art in the Park
Later this spring, I'll be participating in the Art in the Park show in Ypsilanti, Saturday, May 22 from 10 a.m. to 3 p.m. It is a fundraiser for the Ypsilanti Senior Community Center and will host more than 25 artists at the 1015 N. Congress Street community center.


So if you're looking for that perfect pair of handmade earrings, a unique Mother's Day gift for Mom, a beautifully designed and hand-silkscreened tee or just something you won't find at the mall — come on out to these shows and support your local artists!

Wednesday, April 07, 2010

Spring is sprouting!

seeds sprouting
Hope everything's coming up roses for you today!!!
The seeds are sprouting around here.

Tuesday, April 06, 2010

Sunday drives and shoe trees

On Sunday the boy and I took a drive. In just ten minutes, you can be out of Ann Arbor onto dirt roads, farms whizzing by, acres upon acres of open fields or, deep into the woods with trees forming a canopy over the road. I love that. I also love this: A shoe tree of a different sort.


These photos don't even begin to capture how amazing and funny and crazy this is. It's on a road surrounded by farms. Some of the shoes are so high up. There must be hundreds of them. There are high heels and work boots, tennis shoes and flip flops.

Monday, April 05, 2010

Orange-Soy Braised Pork Ribs

Orange-Soy Braised pork ribs
While many of you were enjoying hot cross buns or a roast lamb Easter dinner yesterday, the boy and I were winging it to Asia — in our mouths at least! After obsessing over the best spareribs ever, I scooped up some country-style pork ribs on sale at the grocery. Obviously I don't know from ribs and though they were obviously bigger and fattier than spareribs, I thought I could still apply the same recipe with at least similar results. Not so. No good — quite awful in fact. Part of it I'm sure is the quality of the ribs we had the first go round since they were from Old Pine Farm, our meat CSA. But, this cut definitely calls for a wholly different approach. They came in a big old honkin' package and I had used half for the first attempt. But here's what turned out to be a really tasty solution for the second half we had. So now that I've completely turned you off of country-style ribs… you should try this, it's good. Really.


Orange-Soy Braised Pork Ribs
Adapted from Gourmet, January 2005
2 pounds country-style pork ribs
1 Tb olive oil
1/2 onion, chopped
2 Tb finely chopped peeled fresh ginger
3-4 cloves garlic, minced
3/4 cup fresh orange juice
1/4 cup soy sauce
1 1/2 tsp sugar
1/4 tsp coarsely ground black pepper
Generous squirt Sriracha or other hot sauce

Separate ribs into individual pieces. Place in large stockpot and cover with water by two inches. Bring to a boil and then reduce heat. Simmer for 20-30 minutes, skimming foam that rises to the surface. This will help remove much of the fat. Drain well in colander and pat dry.

Position rack in middle of oven and preheat to 325°F.

Meanwhile, heat oil over moderate heat in a Dutch oven or other heavy pot. Add onions, garlic and ginger and saute until onion is soft, 5-7 minutes. Stir in orange juice, soy sauce, sugar and pepper and bring to a boil over moderately high heat, stirring until sugar is dissolved. Add Sriracha to taste. Place ribs in sauce, turning to coat, and cover. Braise ribs in oven until very tender and falling off the bones, about 2 - 2 1/2 hours.

If sauce seems fatty, remove meat and skim. Return meat to sauce and "pull" or shred with two forks. Serve with lots of jasmine rice to soak up the sauce.

I plan to stuff wonton wrappers with the leftovers tonight and steam them. Tasty!

Friday, April 02, 2010

Gardening on the cheap: Save those seeds!

At the end of the growing season last year, we let a number of plants, including radishes, snap peas, dill and cilantro, grow like crazy without harvesting them. We wanted them to go to seed so we could collect them to grow this year. I had only done this once before — with a mallow plant from my mom — and it worked out really well. We also saved the seeds from our jalapenos. Now, a year later, it's time to plant the harvested seeds. I'm really interested to see how they do compared to the store-bought seeds. We had some left over from those we bought last year, so I've planted those, too and plan to take notes and compare their progress!

I had read online that radish seeds were really hard to gather — not so. They put out huge stalks if you let them keep growing and then pods form on the ends. We just pulled out the stalks, plopped them in the vase you see above and admired them all winter. They sat on a bookcase next to a vase filled with corn tassels the boy saved, too. Two nights ago I cracked open the pods, picked out the perfectly preserved seeds and planted them. They are already sprouting — yay!

Are you growing anything this year? Why not save some of the seeds for next year or to share with a friend?

P.S. Thanks to everyone who commented over at Bloesem Kids yesterday — I'm so happy to have been awarded second place for my design. Yippee!

Thursday, April 01, 2010

Bloesem Kids Banner redesign: Part II

Yay! My design is one of the finalists for the Bloesem kids banner redesign I mentioned on Friday. Won't you go have a look (and perhaps cast your vote with a comment, hint, hint. I'm entry #2. ) at the entries and let Irene know what you think?! She's got a tough choice in front of her. I am loving the design below by Homemade Happiness. Isn't it sweet?!

Tuesday, March 30, 2010

Lemon Ginger Scones

Lemon Ginger SconesOne of the first recipes I learned to bake as an adult — after the chocolate chip cookies and Duncan Hines brownies of my youth — was Orange-Cranberry Scones. Scones came on strong in the early nineties — probably with the rise of the coffeehouse. I caught on quickly and was eating one too many scones in my frantic New York City way. I would escape the city on the weekend and head to my parents who were living in a quiet somewhat rural area — without any cafes to serve me my fix of butter. My weekend scone-jonesing was so severe that eventually I made my own. It was pure love — and a heck of a lot of butter.

Lemon Ginger SconesLemon Ginger Scones
This Lemon Ginger variation was inspired by the ones they serve here in Ann Arbor at Comet Coffee in Nickels Arcade. If you haven't been there, I can't say enough about it. Their coffee — they're part of the new wave of pour-over coffee spreading throughout town — is my favorite in town and the emo, tattooed-covered staff is always shockingly happy-go-lucky and friendly. And, of course, their lemon-ginger scones are addictive. So here's my take:

Lemon Ginger Scones
Adapted from Joy of Baking

Makes 6 - 8 scones.

2 cups all-purpose flour
1/4 cup sugar
1 tsp baking powder
1/4 tsp baking soda
1/4 tsp salt
1/2 cup (1 stick) unsalted butter, cut into 1/2-inch pieces and kept chilled
1/2 cup crystallized ginger, chopped into small to medium pieces
Zest of 1 large lemon (about 1 TB)
2/3 cup buttermilk

1 large egg, lightly beaten
1 TB milk

Raw sugar for sprinkling, optional

Lemon Ginger Scones

Preheat oven to 400º F and place rack in middle of oven. Line a baking sheet with parchment paper.

In a large bowl, whisk together the flour, sugar, baking powder, baking soda and salt. Add the chilled butter pieces and blend into the flour mixture with a pastry blender or two knives. The mixture should look like coarse crumbs. Stir in the chopped crystallized ginger and lemon zest. Add the buttermilk to the flour mixture and stir just until the dough comes together. Do not over mix the dough.

Transfer to a lightly floured surface and knead dough gently four or five times to bring it together and then pat into a circle that is about 7 inches round and about 1 1/2 inches thick. Cut this circle in half, then cut each half into 3 or 4 pie-shaped wedges (triangles). Place the scones on the baking sheet. Beat the egg well and combine with with 1 TB milk. Brush the tops of the scones with this mixture. Sprinkle with raw sugar if using.

Bake for about 20 to 25 minutes or until golden brown and a toothpick inserted in the middle comes out clean. Transfer to a wire rack to cool.

Lemon Ginger Scones

Some crystallized ginger is more sweet than others — or perhaps I should say less sweet. The batch I used today was extra gingery, so I kicked up the sugar just a tad. Take a nibble of yours and adjust accordingly.