Showing posts with label recipe. Show all posts

Monday, March 04, 2013

Blackout Cake

Happy Monday, people! Guess what? I baked you a cake. Yes, that's right — a cake. A luscious, layered chocolate cake.

At the beginning of each year I have a tendency to make big promises here on the blog … and then proceed to immediately forget and/or ignore them. In 2010, I declared it the year of cake. I had never made what I termed a "grown-up" cake and stated that I would do so in 2010. I did not.

This year, I promised I would post a recipe a week. I did kinda okay in January: Paris Mushroom Soup, Chicken Tinga TacosChallah Bread. I even made it into the first week of February: Butter Chicken. Then, boom: Nada. Nothing. *sigh.*

You'd think I would learn. I wanted to make it up to you with a cake. A real, tried-and-true grown-up cake. My first tried-and-true grown-up cake. This is a rich, dense chocolate cake—not for the faint of heart, which I know you are not.


Chocolate Blackout Cake
via Food & Wine

CAKE
1 stick unsalted butter, softened, plus more for the pan
2 1/4 cups cake flour, plus more for dusting
1/4 cup solid vegetable shortening
2 cups sugar
3 large eggs
2 teaspoons pure vanilla extract
3/4 cup unsweetened natural cocoa powder (See Note)
1 teaspoon baking powder
1 teaspoon baking soda
1/2 teaspoon salt
1 cup milk

FILLING
3 cups water
2 1/2 cups sugar
1 tablespoon light corn syrup
1 1/2 cups unsweetened natural cocoa powder (See Note)
2/3 cup cornstarch
6 tablespoons unsalted butter, cut into small cubes
1/2 teaspoon pure vanilla extract
Pinch of salt

1. MAKE THE CAKE Preheat the oven to 375°. Butter two 9-inch round cake pans and coat lightly with flour. Line the bottoms with parchment paper. In a standing electric mixer fitted with the whisk, beat the 1 stick of butter with the shortening until creamy. Add the sugar and beat at medium speed until fluffy, about 3 minutes. Add the eggs one at a time, beating well between additions. Add the vanilla. At very low speed, beat in the cocoa powder, baking powder, baking soda and salt. Add the 2 1/4 cups of cake flour and the milk in 3 separate alternating batches, scraping down the side and bottom of the bowl occasionally.

2. Divide the cake batter between the prepared pans and smooth the tops. Bake in the center of the oven for about 25 to 30 minutes, until a toothpick inserted in the centers comes out with a few moist crumbs attached. Let the cakes cool for 15 minutes, then invert them onto a rack and let cool completely.

3. MEANWHILE, MAKE THE FILLING In a large saucepan, combine 2 1/2 cups of the water with the sugar, corn syrup and cocoa powder and bring to a boil, whisking constantly. In a bowl, whisk the cornstarch with the remaining 1/2 cup of water until smooth; whisk into the cocoa mixture. Cook over moderately high heat, whisking constantly, until very thick, 3 minutes. Off the heat, whisk in the butter, vanilla and salt. Scrape the filling into a bowl and press a sheet of plastic wrap onto the surface of the filling. Let cool, then refrigerate until firm, 45 minutes.

4. Using a serrated knife, halve each cake layer horizontally. Break up the less attractive top cake layer and transfer to a food processor; pulse into crumbs. Reserve the two cake bottoms and one smoother top.

5. Set one of the cake bottoms on a cake plate and spread with 1 1/2 cups of the filling. Top with the second bottom layer and another 1 1/2 cups of filling. Cover with the cake top and spread the remaining filling all over the top and side. Pat the crumbs all over the cake. Refrigerate for at least 1 hour before serving.


Thursday, February 07, 2013

Mmmmm, Butter Chicken

Okay, so we're into February now. You've done your juice cleanse, you've been working out like you promised yourself you would … but your resolve is wavering and it's still winter. You're ready for a little hearty comfort. 

This butter chicken is the answer, my friends. It starts with a healthy spice-filled yogurt marinade for the chicken but then is finished with a heart-warming, soul-satisfying cream and butter-ladened sauce the most beautiful color of orange you've ever seen on a cold winter's day. The  fresh curry leaves are a bit hard to come by, but if you're in the Ann Arbor area, you can find them —and everything else you need might need, i.e. cheap cardamom — at Bombay Grocers on Packard.


Butter Chicken (Murgh Makhanwala)
via Saveur

Serves 4.

FOR THE CHICKEN:
1/2 cup Greek yogurt
2 tbsp. fresh lemon juice
1 tbsp. canola oil
2 tsp. garam masala
1 tsp. crushed red chile flakes
4 cloves garlic, minced
1 3-inch piece ginger, peeled and thinly sliced crosswise
Kosher salt, to taste
1 3–4-lb. chicken, cut into 8 pieces, skin removed

FOR THE RAITA:
1/2 English cucumber (about 6 oz.), seeded and grated
1/2 medium tomato, seeded and finely chopped
1 1/2 tsp. kosher salt
1 cup plain yogurt
1 1/2 tbsp. roughly chopped fresh mint leaves
1 tsp. fresh lemon juice
1/2 tsp. ground coriander
1/4 tsp. ground cumin
1/2 medium carrot, finely grated

FOR THE SAUCE:
1 tsp. crushed red chile flakes
4 cloves garlic, minced
4 green cardamom pods, cracked
3 whole cloves, crushed
1 28-oz. can whole peeled tomatoes, undrained
1 3" piece ginger, washed and grated (skin on)
1 bay leaf
1/3 cup heavy cream
4 tbsp. unsalted butter, cut into 1/2" cubes
1 tsp. garam masala

4 fresh or frozen curry leaves
Kosher salt and freshly ground black pepper, to taste

Marinate the chicken: Combine all marinade ingredients except for chicken in a food processor; purée. Transfer marinade to a large bowl and add chicken, tossing to coat. Cover with plastic wrap and refrigerate for at least 4 hours or overnight.

Preheat oven to 500° F. 

Transfer chicken to an aluminum foil-lined baking sheet and spoon any marinade from bowl over chicken. Bake until light brown but not cooked through, about 20 minutes. Transfer to a rack; set aside. 

Meanwhile, make raita: Toss cucumbers, tomatoes, and salt in a colander and let sit for 10 minutes. Press cucumbers and tomatoes to drain well and then transfer to a medium bowl along with yogurt, mint, lemon juice, coriander, cumin, and carrots; toss to combine. Cover with plastic wrap and let sit at room temperature for 1 hour.

Make the sauce: In a 6-qt. pot over medium-high heat, combine chile flakes, garlic, cardamom, cloves, tomatoes, ginger, bay leaf, and 2/3 cup water. Bring to a simmer, reduce heat to medium-low, and cook, stirring often and crushing tomatoes with a spoon, for 25 minutes. Discard bay leaf and transfer sauce to a food processor; purée. Return sauce to pot and continue cooking over medium-low heat until thickened slightly, about 15 minutes. 

Add reserved chicken pieces and any marinade from pan, along with 1/3 cup water. Cook, stirring occasionally, until sauce thickens and chicken is cooked through, about 10 minutes. Stir in cream, butter, garam masala, and curry leaves. Reduce heat to low and cook until flavors meld, about 5 minutes; season with salt and pepper. Remove from heat and keep warm.

To serve, transfer chicken and sauce to a serving platter and serve with the raita.


Wednesday, January 23, 2013

Challah Bread

Isn't she a beauty?! I can't help it—I am pleased. This is one pretty loaf of bread that came out of my oven.

I've been wanting to try baking challah for ages. I was working my way through overwhelming stacks of food magazines over the holidays and came across this recipe in Saveur that I decided to give a shot. I took it to a holiday party so don't have any photos of the inside, but it definitely held its own and was fantastic for a first go-round. Lots of oohing and ahhing. Cuz it's dang purdy.

The original recipe had you braid four portions, but … what?!? How does that work? Go for three, it makes life easy. And really, challah is not harder than any other bread as long as you can braid. Kneading, rising, shaping, proofing, baking. Try it. You'll like it! And then there's the french toast. Need I say more?


Challah Bread
Adapted from Saveur
Makes 1 loaf
3/4 cup plus 2 tbsp. milk, heated to 115°
1/4 cup plus 1 tsp. sugar
2 tsp. active dry yeast
4 tbsp. unsalted butter,
melted, plus more for
greasing
2 eggs, lightly beaten
4 cups flour
1 1/2 tsp. kosher salt
1 egg yolk
Sesame seeds, to garnish

Stir together milk, 1 tsp. sugar, and yeast in a large bowl. Let sit until foamy,  about 10 minutes. 

Meanwhile, in a small bowl, whisk together butter and eggs. Add to yeast mixture and stir to combine. Add flour, remaining sugar, and salt and stir with a wooden spoon until a dough forms. 

Transfer dough to a lightly floured work surface and knead until smooth, 6–8 minutes. Transfer to a lightly greased large bowl and cover with plastic wrap; let sit until doubled in size, about 1 hour. Uncover, punch dough down, and re-cover; let sit until slightly puffed, 30 minutes.

Uncover dough, divide into 3 equal portions, and roll each into a 18"-long rope. Align dough ropes side by side, and pinch together ends farthest from you to form one end of loaf. Braid ropes and pinch ends together  and fold under slightly to seal.  Transfer braided loaf to a parchment paper—lined baking sheet and cover loosely with plastic wrap; let proof for 1 hour.

Preheat oven to 375°. 

Stir together egg yolk and 1 tbsp. water in a small bowl and brush all over surface of loaf; sprinkle evenly with sesame seeds. Bake until loaf is dark golden brown, 30–35 minutes. Transfer to a wire rack and let cool for 30 minutes before serving.


Wednesday, January 16, 2013

Chicken Tinga Tacos

This is the perfect Sunday afternoon dish. A hearty pot of chicken braising in a mildly spicy tomato-based sauce that heats the house with currents of warm air and wafting sweet smells. There will be plenty of leftovers whose flavors ripen over the next day or two and countless ways of re-imagining and presenting the tender morsels of smoky shredded chicken and sauce. On the first night, have tacos. Next, add some shredded monterey to make smoky quesadillas dolloped generously with sour cream and sprinkled with scallions. I can't decide which I liked more.

The baking dish size may seem large for the amount of chicken, but it makes the layers of sauce surrounding it caramelize more during cooking. If you use a smaller dish, the cooking time will be longer and you may want to remove the chicken once it is cooked through and let the sauce continue to darken and cook in the oven.

Chicken Tinga Tacos
via Food & Wine

1/4 cup plus 2 tablespoons extra-virgin olive oil
2 1/2 pounds trimmed, skinless, bone-in chicken thighs
Salt and freshly ground black pepper
1 large onion, thinly sliced
3 large garlic cloves, minced
One 28-ounce can diced tomatoes
2 canned chipotles in adobo, coarsely chopped
1 cup chicken broth
24 corn tortillas
2 ounces Cotija cheese, crumbled
Sliced scallions and chopped cilantro, for garnish

Season the chicken all over with salt and pepper. Heat 3 tablespoons of the olive oil in a large nonstick or cast iron skillet. Add the chicken to the skillet and cook over moderately high heat, turning once, until well browned, about 10 to 12 minutes. Transfer the chicken to a 9-by-13-inch baking dish and pour off the fat in the skillet.

Add the remaining 3 tablespoons of olive oil to the skillet along with the onion. Cook over moderately high heat, stirring occasionally, until the onion is lightly browned and softened, 5 minutes. Add the garlic and cook until fragrant, 2 minutes. Add the tomatoes and their juices, the chipotles and the broth and bring to a boil. Simmer over moderate heat, stirring occasionally, until thickened and slightly reduced, 20 minutes.
Preheat the oven to 350°F. 

Transfer the sauce to a food processor and let cool for 15 minutes. Puree until smooth and season with salt and pepper. Pour the sauce over the chicken. Bake the chicken uncovered in the center of the oven for about 45 minutes, until the meat is tender and the sauce is very thick and darkened around the edges. 

Wrap the tortillas in foil and warm them in the oven for about 10 minutes.

Meanwhile, remove the chicken from the sauce and shred the meat; discard the bones. Return the chicken meat to the sauce and heat for 2 to 3 minutes to be sure chicken is hot. Spoon about 3 tablespoons of chicken onto each tortilla and sprinkle with the crumbled cheese. Garnish with scallions and chopped cilantro.


Monday, January 07, 2013

Paris Mushroom Soup

Happy New Year! It was so nice to take a little internet break and soak up the snowy days nestled on the couch with a few great books and not a few roaring fires. I feel rested and ready to dive into the new year head first. How about you?

I've been cooking up a storm, too as I tend to do this time of year. I know many of you enjoy that most about my blog and my recipe posts were few and far between toward the second half of last year. Thanks so much for following along regardless. My plan is to post at least one recipe per week in 2013.  I added a recipe index at the beginning of last year and I hope to refine it this year to make it a bit easier to navigate. I've also been itching to update the look of the blog, so stay tuned for that.


In the meantime, I thought it would be appropriate to start the year off with a soup recipe: It's comforting and healthy all rolled up in one. This soup is velvety smooth with a rich yet clean flavor. It comes from Dorie Greenspan's Around My French Table and includes a little "salad" of thinly sliced mushrooms, scallions, parsley and chives that you pour the soup over just before serving. You could skip this part but it really does make the soup all the much better. Don't forget to season it! And again, you could use black pepper over the white, but the white pepper is just that much better with a more subtle flavor.


Paris Mushroom Soup
via Dorie Greenspan's Around My French Table 

2 tablespoons unsalted butter
1 1/2 large onions, coarsely chopped
3 large cloves garlic, coarsely chopped
Salt and freshly ground white pepper
1 1/2 pounds white button mushrooms, trimmed, sliced
1/3 cup dry white wine
2 parsley sprigs
1 rosemary sprig
6 cups chicken broth or water
6 large white button mushrooms
2 scallions, thinly sliced (optional)
2 Tablespoons minced fresh parsley
1 Tablespoon minced fresh chives
Salt and freshly ground white pepper

Creme fraiche or sour cream, optional

Melt 1 tablespoon of the butter in a large Dutch oven or soup pot over low heat. Add the onions and garlic and season with salt and white pepper to taste. Cook, stirring often, for about 5 minutes, until the vegetables are soft. Add the mushrooms and the remaining tablespoon of butter, raise the heat to medium and cook, stirring often, until the mushrooms start to release their liquid, about 3 minutes. Increase the heat to high and cook until almost all the liquid evaporates, about 15 to 20 minutes. Pour in the wine and let it boil until it, too, almost evaporates.

Toss the herbs into the pot and add the broth or water. Bring to a boil. Lower the heat, cover the pot almost completely and cook at a gentle simmer for 20 minutes.

If you can, pull out the rosemary sprig and discard.Working in small batches in a blender or food processor, puree the soup until it is very smooth. Taste and season with salt and white pepper as necessary. Pour the soup back into the pot and heat it gently over low heat until hot. 

Divide the mushrooms, scallions (if using), parsley and chives among six soup plates. Season lightly with salt and white pepper. Ladle the soup into the bowls and top each with a dollop of creme fraiche or sour cream, if desired.


Tuesday, October 23, 2012

Spicy Carrot Sandwiches

Before we return to our regularly scheduled feature of Book Business Tuesdays, I wanted to jump right in with a recipe because I know you guys kinda like it when I do. I had this for lunch yesterday and was itching to write it up immediately. It is an open-faced sandwich with a beautiful balance of flavors -- not to mention pretty and colorful on the plate!  It combines carrots with caraway, something I would never have thought of but works tremendously well. I played around with the Food & Wine version substituting a white bean spread where they called for hummus becaue that's what I had the fixins for and really liked the results. I also garnished with a little fresh oregano instead of cilantro because I thought it would play better with the rosemary in the bean spread. Do what you will ... it's bound to be good!


Spicy Carrot Sandwiches
Adapted from Food & Wine

Serves 4.

2 large carrots, coarsely grated
1 tablespoon extra-virgin olive oil
2 garlic cloves, thinly sliced
1 teaspoon caraway seeds
Salt
Crushed red pepper
4 slices of multigrain bread or two 8-inch whole wheat baguettes, split lengthwise and grilled
1/2 cup plus 2 tablespoons white bean dip (recipe below) or hummus
1/4 cup Greek yogurt
Cilantro
Freshly ground black pepper

In a skillet, heat the olive oil. Add the carrots, garlic and caraway, season with salt and crushed red pepper and cook until the carrots are just wilted, about 4 minutes. Let cool.

Spread the white bean spread on the bread. Sprinkle with the carrot mixture and dollop on the yogurt. Top with cilantro, season with black pepper and serve.


White Bean Dip

1 (15-ounce) can white beans such as cannellini or great northern, drained and rinsed
2 cloves garlic, roughly chopped
2 tablespoons fresh lemon juice
5 Tb olive oil
2 Tb fresh rosemary, chopped
Salt
Freshly ground black pepper

Combine the beans, garlic, lemon juice, 1/3 cup olive oil, and parsley in a small food processor. Puree until smooth. Season generously with salt and pepper, to taste. 

Wednesday, August 29, 2012

BBQ Ribs for Two

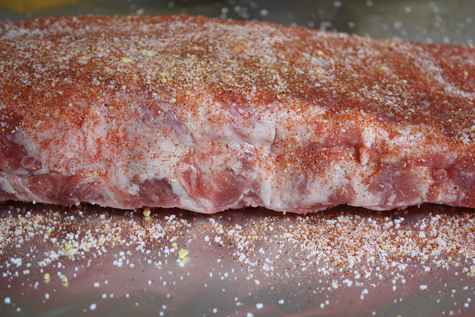
Ribs are one of those things you want to make for a crowd … right? Heck no! The boy and I had a hankering and decided to make it happen — on a weeknight no less. If you split this into a two-part process: Baking the ribs with a dry rub one night and then grilling the next, it's no biggie. 

This no-brainer recipe—adapted from a Bon Appetit recipe for 8 servings—with a five-ingredient dry rub you probably have everything for on hand and store-bought sauce (I know!) enhanced with the porkie drippings … it can't be beat. Throw in a little vinegary potato salad and pickled corn … you've got yourselves a party for two (with leftovers)! 


BBQ Ribs
Adapted from via Bon Appetit

1 1/4 tablespoons kosher salt
1 1/2 tsp dry mustard
1 1/2 tsp paprika
1/4 teaspoon cayenne pepper
1/4 teaspoon freshly ground black pepper
2.5 pounds baby back pork ribs (1 rack)
Low-salt chicken broth (optional)
1 cup store-bought or homemade barbecue sauce plus more

Preheat oven to 350°F. 

Combine first 5 ingredients in a small bowl. Place the ribs on a double layer of foil; sprinkle rub all over ribs (you will probably have a little bit extra, but too much can't hurt). Seal up foil and place ribs on a baking sheet.

Bake ribs until very tender but not falling apart, about two hours. Carefully unwrap ribs — watch your face for steam! Pour juices from foil into a heatproof measuring cup and set aside to cool. Let ribs cool completely. 

(Ribs can be baked up to three days ahead (the flavor will be more developed, and the cold ribs will hold together better on the grill as they heat through). Cover and chill juices. Rewrap ribs in foil and chill.)

Build a medium-hot fire in a charcoal grill, or heat a gas grill to high. 

Remove layer of fat from reserved juices. Add broth or water to rib juices in an equal amount to what juices you have. I was left with just over a cup of juices, so added 1 cup sauce. Whisk well to blend.

Grill ribs, basting with barbecue sauce mixture and turning frequently, until lacquered and charred in places and heated through, 7-10 minutes. Transfer to a cutting board; cut between ribs to separate. Transfer to a platter and serve with additional barbecue sauce. 

Lick those fingers! 

Monday, August 20, 2012

Ginger muffins

These wonderful muffins are from home cook advocate and cookbook author, Marion Cunningham. She passed away last month at ninety and Lottie & Doof called upon this recipe in her honor. I followed suit and am new fan. If you are unfamiliar with Cunningham, Kim Severson — an amazing author and cook in her own right — wrote a wonderful obituary in The New York Times.

In the meantime, these muffins are delicate and simple, moist and delicious warm from the oven. I used the excuse of a somewhat upset stomach to gobble three in a row. Ginger settles the upset stomach, right?

I experimented using paper liners for half the muffins — I preferred those in the greased tin. The liners affected the texture of the baked muffins, making them a little stiff on the outside. 

Ginger Muffins 
From Lottie & Doof who adapted from The Breakfast Book by Marion Cunningham
Makes 12 muffins.

3 oz (or even a little more) piece of unpeeled ginger root, cleaned well
3/4 cup plus 3 Tbsp. sugar, divided
2 tablespoons grated lemon zest
8 tablespoons (1 stick) unsalted butter, at room temperature
2 large eggs, at room temperature
1 cup buttermilk
2 cups all-purpose flour
1/2 teaspoon salt
3/4 teaspoon baking soda

Preheat the oven to 375°F. Grease a muffin tin.

Cut the unpeeled ginger root into large chunks. If you have a food processor, process the ginger until it is in tiny pieces; alternatively, mince by hand. Measure out 1/3 cup – or a little more. As Marion says, it’s better to have too much than too little. Put the ginger and 1/4 cup sugar in a small skillet and cook over medium heat, stirring, until the sugar has melted and the mixture is hot. This will only take a minute or two. Set aside to cool.

In a small bowl, combine the lemon zest and 3 tablespoons of sugar. Rub the zest into the sugar with your fingers to release the oils. Add the lemon sugar to the ginger mixture.

Put the butter and remaining 1/2 cup of sugar in the bowl of a stand mixer (or, a mixing bowl, if you plan to use handheld beaters or mix by hand) and beat until smooth. Add the eggs, and beat well. Add the buttermilk, and beat until blended. Add the flour, salt, and baking soda, and beat just until smooth. Add the ginger-lemon mixture, and beat to mix well. Spoon the batter into the prepared muffin tin. 

Bake for 15 to 20 minutes, or until a tester comes out clean. Serve warm.


Monday, August 13, 2012

Refrigerator pickle madness

Has the pickling bug caught you yet? It's definitely increasing in popularity, and there are a million and one new recipe books I'm dying to get my hands on. That said, I haven't gotten beyond refrigerator pickles yet. Yes, it's true. But I'm all over those like crazy. This recipe has become my go-to for every which way of veggie. It doesn't even involve heating the brine. It's the perfect balance of tart and crunch with a little bit of zing from the red peppers and lots of garlicky bite. I've tried it with cucumbers — both spears and slices, green beans, radishes and carrots. I just keep adding to the jar as I eat my way through them, topping up with some new brine as necessary. They seem to best the first week, though I'm not sure we've had any that weren't gobbled up in that time around here! 
 

Spicy Garlic Dilly Beans
Adapted from Eat.Repeat

Approx. 1/2 lb green beans, washed and trimmed
2 to 3 cloves garlic
3 to 4 springs fresh dill
1/4 tsp dill seed
1/4 tsp mustard seed
1/4 tsp whole peppercorns
Pinch of red pepper flakes
1 1/2 tsp pickling salt or kosher salt
1/2 cup white vinegar
1/2 cup water

Wash a pint-sized mason jar with hot, soapy water.
Measure dill seed, mustard, peppercorns and pepper flakes into the bottom of your jar.
Pack beans into jar vertically. Slip garlic cloves in between beans.
In a separate jar combine salt, vinegar, and water. Shake until salt is dissolved then pour over beans.
Refrigerate beans for at least 24 hours.

Tuesday, July 31, 2012

Summer squash carpaccio

What's cooking? Not much around here you might say, but here's a little recipe that continues the non-cooking, while letting you eat in a flash. It's a beautiful and simple summer squash carpaccio. I've tried several variations of this in the last few weeks and so far, this recipe from Tyler Florence is my favorite. But it also lends itself to countless variations: tried it with some toasted pine nuts or walnuts, throw in some dill or chives, cut the squash lengthwise, rather than in disk, add tomatoes. You name it.


Summer Squash Carpaccio
Adapted from Food Network

2 medium zucchini or yellow squash
Kosher salt and freshly ground black pepper
1 tablespoon extra-virgin olive oil
1/2 lemon, juiced
1 leek, white part only, sliced thinly
1/4 pound piece Parmesan
Fresh mint leaves, for garnish
Directions

Using a mandolin, vegetable peeler or a very sharp knife, slice zucchini into very thin rounds. I used a vegetable peeler for slicing: zucchini and squash are quite tender, so it works like a charm. I chose one zucchini and one yellow squash since it makes a pretty presentation.

Arrange zucchini disks slightly overlapping in a single layer on a plate and season with salt and pepper. Drizzle with the olive oil and lemon juice and scatter with leeks. Shave very thin slices of Parmesan over the plate with a peeler. Scatter mint leaves over top and serve immediately.


Wednesday, June 27, 2012

Roast Pork and Summer Vegetables

This is one of those recipes that is deceptively long, but you shouldn't be intimidated. It's really  straightforward: make a dry rub - make a little sauce - roast some veggies - cook the pork. That's it. It makes a mountain of food that tastes just as good at room temperature, and certainly the next day. In other words, the perfect summer recipe. Make it on Saturday and feed a crowd, or nibble on it in various ways for days and days. 

The roasted vegetable combination is amazing and would taste great in a burrito or just all mixed together as a salad, maybe with a grain thrown in for a complete meal. I skipped the broccoli rabe just because and you could throw in any other veggies you happen to have. And I'm not sure why the shallots are unpeeled, but I did this and they look so pretty, I would do it again. Make extra because you'll find yourself reaching into the fridge for them just on their own. AND… you can make a mean Cuban sandwich with the leftover pork!!

Roast Pork with Summer Vegetables
via Saveur
Serves 6 to 8.


FOR THE PORK:
1 tbsp. coriander seeds
1 1⁄2 tsp. fennel seeds
1 tsp. cumin seeds
2 tbsp. smoked paprika
2 tbsp. turbinado or light brown sugar
2 cloves garlic, minced
1 3–4-lb. piece trimmed, boneless pork shoulder
Kosher salt, to taste
4 shallots, unpeeled and halved lengthwise
2 tbsp. canola oil

FOR THE HERB SAUCE:
1 tsp. coriander seeds
1⁄2 tsp. cumin seeds
1 green cardamom pod
1⁄2 cup minced cilantro
2 cloves garlic, minced
1 jalapeño, stemmed, seeded, and minced
1/4-1/2 cup extra-virgin olive oil
Kosher salt, to taste

FOR THE VEGETABLES:
2 large sweet potatoes
4 tomatillos, peeled
2 poblano peppers
6 tbsp. extra-virgin olive oil
5 cloves garlic
1⁄2 bunch broccoli rabe, trimmed and blanched until crisp-tender

1. Prepare the pork: Put coriander, fennel, and cumin in an 8" skillet over medium heat and cook, swirling pan occasionally, until seeds are toasted, about 5 minutes. Coarsely grind seeds in a spice grinder and transfer to a small bowl. Add paprika, sugar, and garlic and stir to combine. Put pork on a plate and season generously with salt. Rub pork with coriander mixture and cover with plastic wrap. Let sit at room temperature for at least 1 hour or refrigerate overnight.

2. Make the herb sauce: Put coriander, cumin, and cardamom in an 8" skillet over medium heat and cook, swirling pan occasionally, until seeds are toasted, about 5 minutes. Finely grind seeds in a spice grinder and transfer to a medium bowl along with cilantro, garlic, and jalapeños. Using a fork, whisk in olive oil and season sauce with salt; cover with plastic wrap and set aside.

3. Roast the vegetables: Heat oven to 475°. Put sweet potatoes on a baking sheet and bake, turning once, until tender, 40–50 minutes. Transfer to a plate; set aside. Increase heat to broil and arrange a rack 4" from heating element. Put tomatillos and poblanos on baking sheet and drizzle with 2 tbsp. olive oil. Broil, turning once, until charred and tender, about 10 minutes. Transfer tomatillos to plate with sweet potatoes and transfer poblanos to a bowl. Cover bowl with plastic wrap and set aside for 15 minutes. Peel poblanos, discarding seeds and stems, and tear poblanos into 1⁄2"-wide strips; set aside.

4. Cook the broccoli rabe: Heat remaining olive oil in a 12" skillet over medium heat. Add garlic and cook, turning occasionally, until golden brown, about 5 minutes. Increase heat to medium-high and add broccoli rabe; cook, stirring occasionally, until hot, about 3 minutes. Season with salt and remove pan from heat; set aside.

5. Cook the pork: Reduce oven to 350°. Heat canola oil in a 12" cast-iron skillet over medium-high heat. Add pork and cook, turning, until browned on all sides, about 4 minutes. Place shallots cut side down under pork. Transfer skillet to oven and cook until an instant-read thermometer inserted into thickest part of pork reads 125°, 30–50 minutes. Transfer pork and shallots to a cutting board and let rest for 15 minutes. To serve, slice pork thinly and transfer to a platter along with shallots.

6. Serve: Cut sweet potatoes into small pieces and halve tomatillos. Transfer potatoes, tomatillos, poblanos, and broccoli rabe to platter. Spoon sauce over pork.

The bonus! A Cuban sandwich: dijon mustard, swiss cheese, thinly sliced leftover pork, ham, dill pickles, more swiss cheese. Cook in a large cast iron skillet with smaller heavy cast iron skillet (lean into it!) on top of the sandwich to press it. 


Thursday, June 14, 2012

Lemon Ricotta Blackberry Muffins


It's been a while since I've done much baking around these parts, hasn't it? Well, that is all over my friends. These blackberries called my name in a way that had to be answered with muffins. This recipe calls for a ton of lemon for brightness and the ricotta makes it such a light almost cake-like muffin. Hot out of the oven? Yes, please.


The batter is quite thick, so an ice cream scoop with one of those scraper bar thingys is very useful. As I added the blackberries, I used them to mush down the batter a bit so it was more even. Also, if the blackberries are quite huge, like these, don't worry too much about fully covering them. The batter will unfold around them nicely. I think next time, I might try adding a bit of thyme into the mix. Waddya think?  

Lemon Ricotta Blackberry Muffins
via Two Peas and their Pod
Makes 12 muffins

2 cups all-purpose flour
1/2 teaspoon baking powder
1/2 teaspoon baking soda
1/2 teaspoon salt
1 cup granulated sugar
Zest of 2 lemons
1/2 cup unsalted butter, at room temperature
1 cup ricotta cheese (whole or low-fat is fine)
1 large egg
1 tablespoon fresh lemon juice
1 teaspoon vanilla extract
1 cup fresh blackberries
Turbinado sugar for sprinkling

Preheat oven to 350º F. Line 12 muffin cups with paper liners.

In a medium bowl, whisk together the flour, baking powder, baking soda, and salt. 

In a small bowl, combine the sugar and lemon zest with your fingers, rubbing them together until fully incorporated. Using an electric mixer, beat the butter and sugar and lemon zest mixture together until light and fluffy, about two minutes. Add the ricotta cheese and beat until smooth. Beat in the egg, lemon juice, and vanilla extract.

Add the dry ingredients and mix until just blended. Using an ice cream scoop or large spoon, fill each muffin cup half way with batter. Add two to three blackberries to each muffin cup. Top the muffins with remaining batter so blackberries are covered. Generously sprinkle turbinado sugar over each muffin top.

Bake muffins for about 20-25 minutes, or until the tops are slightly golden brown. Let muffins cool for five minutes and serve.